Quantcast
Channel: ConfigMgr – MSEndpointMgr
Viewing all 347 articles
Browse latest View live

Notes from the field – Do I really need MDT integration?

$
0
0

For many years, in fact, since I started my own career with Configuration Manager, the tried and tested method of building task sequences was to integrate MDT.

MDT integration was seen to offer the best of both worlds, as MDT of course includes a lot of automation logic out of the box. The prospect of being able to assign roles, have your log files dropped into a share and simple things like determine if the machine running a test sequence was a laptop, was something that we all appreciated.

In this post though I am going to challenge is this something we still need today, with all the advances in the native Configuration Manager product.

MDT – A Great Solution

I recall reading about the benefits of MDT integration from books like Deployment Fundamentals from Johan Arwidmark and Mikael Nystrom, and thinking this is great, I simply must have this, and at the time of course, it was awesome.

Being able to place machines in the correct OU at deployment time, based on their IP gateway, naming them according to a naming convention that obtained the serial number, and being able to collect the deployment logs, was just a joy to behold.

At the time of course even the imaging process itself was something that favoured on the side of having MDT, in a process that perhaps even some new to OSD might be unfamiliar with, I am of course talking about “build and capture”.

Putting an image in the oven was often a term used when talking about when building a new reference image, the benefit of MDT of course was that you were able to perform a light touch (or zero touch with some scripting) process for initiating a VM boot, deploying the image, layering in applications, and finally patching, before capturing an image that you could then import into Configuration Manager.

The process was a thing of beauty back in the Windows XP & 7 days. Even today there are reasons why a “fat or golden image” with applications is still preferable due to the considerable deployment time that could be caused by injecting lots of applications.

Windows & Configuration Manager Advancements

Over the past three years in particular we have all benefited massively from the work of the Configuration Manager and Windows product groups in Microsoft. They have without question improved both respective products significantly, and with improvements has come change.

Today Configuration Manager for instance has native PowerShell support, which for many, was a game changer. This single feature encouraged many in the community to develop their own solutions, and automation steps as required.

Windows 10 update frequency steered us away from the build and capture process at the same time. Serving became more reliable and also something that many members of the community including David Segura (OSDBuilder) and our own Donna Ryan (WimWitch) have championed with their own solutions. In fact the advice was to move away from the heavy build and capture process, using the now, more frequently updated, Windows 10 installation WIM files.

With all of this combined, I’ll explain why in my opinion, MDT integration is something that we no longer necessarily need.

Do I Really Need All These Steps?

The primary issue the I see with MDT integrated task sequences, is not for the seasoned veterans of the deployment field, but for those who are new to the game.

Working as a consultant, I often see the look of horror (for want of a better word) on clients faces when you show them a finished MDT integrated task sequence.

The length of the MDT integrated task sequence can be an issue at times

From a client or newcomer perspective the other issue with MDT is that if they are unfamiliar with it. This means they have to learn a new product on top of the one they had employed your services for, not only that but they also need to maintain it afterwards. Providing the additional knowledge transfer required to understand the custom settings and boot settings ini files isn’t generally the issue of course, where it becomes an issue is with the MDT integrated task sequence itself, and the perceived level of complexity it brings.

Having to understand elements outside of the task sequence also proves to be a challenge at times

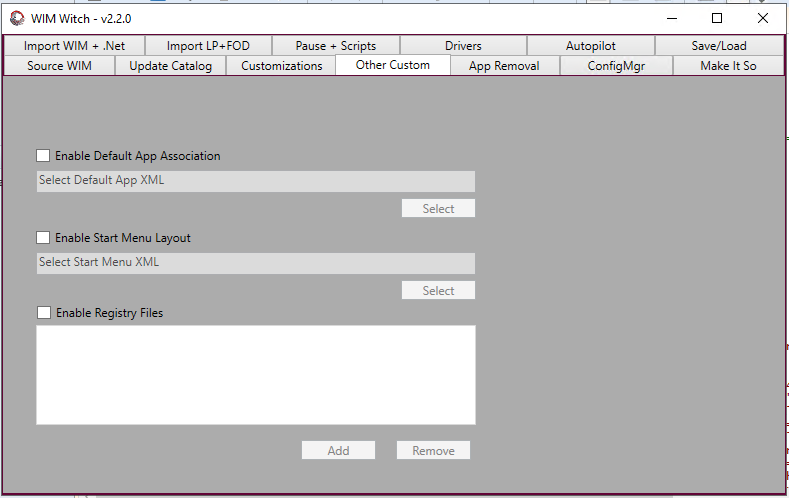
Let’s not get tied down with what you can strip out of it (as I know some reading this will be saying OK, just get rid of what you don’t need) but let us just look at taking it out of the box and add those bits that we really need, i.e. drivers, patching and applications.

In the task sequence screenshots above there are a total of 148 steps, excluding those that are disabled, all of which have a purpose. Of course not all of the steps are followed, some are for bare metal and others are for refresh scenarios, never the less though there is a lot of information for someone to take on board. What I am saying here is that the task sequence looks “busy”.

Less Is More Right?

As I mentioned earlier, PowerShell support along with other improvements such as the regional settings options, has massively improved what Configuration Manager gives you.

At this point some of you might be again shouting “MDT provides automation steps in the product without scripting, which is of course true, but when we consider that learning PowerShell is something that most administrators should be doing (for their own benefit), it then becomes a case of should you be learning something specific or something with broader potential.

So, let us look at the same type of task sequence that is native in Configuration Manager.

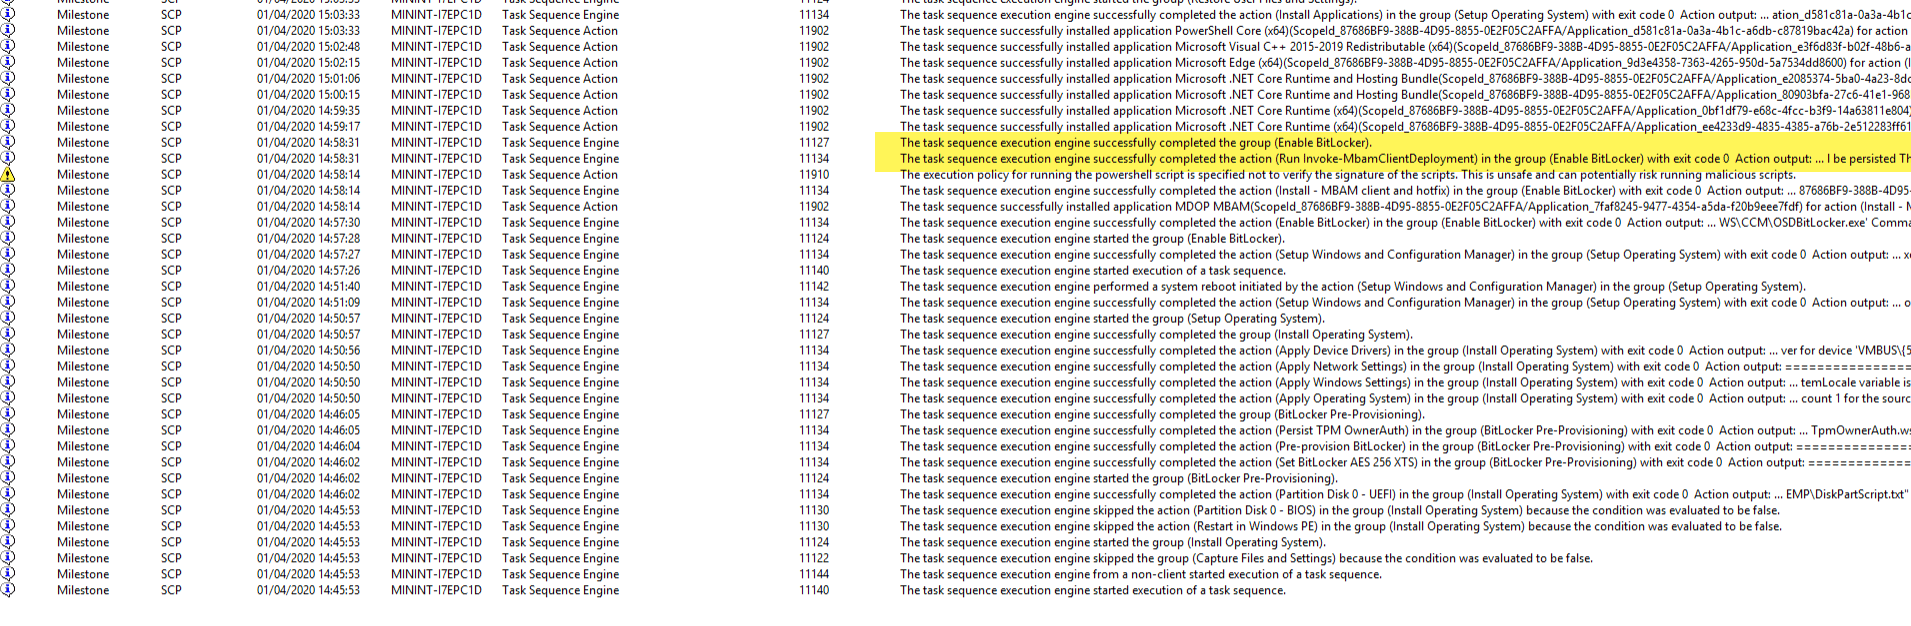
In the above example, the native task sequence achieves the same process in 62 steps. In that instance there is a saving of 86 steps within the task sequence, which is significant to say the least.

By virtue of the fact it is much smaller, it is also easier to follow for anyone who has to maintain the system. Anything custom within the task sequence can also including your own commenting (in your scripts for example).

But What Do I Lose?

Monitoring

One of the nice elements of MDT is the ability to monitor what is going on within your running task sequences. This element is build into the Deployment workbench and with a little help from people in the community (
Damien Van Robaeys for example – https://gallery.technet.microsoft.com/MDT-Web-Report-1e820997), you can render your running tasks as a web page.

This is obviously a nice to have, but the issue I have with MDT monitoring is that it is updated during the gather process.

Keeping it simple, in Configuration Manager, we can simply use the Status Messages to view a live state of a deployment (as Nickolaj Andersen covered on the blog already – https://msendpointmgr.com/2014/02/27/monitor-osd-with-status-message-queries-in-configmgr-2012/);

In my opinion this provides just the information I need, in real time, in order to troubleshoot or validate that deployments are happening in an environment.

Log Collection

The main lacking in the native task sequence at present is the log collection capability, something of course that your MDT integrated task sequence does well. This is something that is extremely useful when troubleshooting failed task sequences, as we are all aware a screenshot of a failure with a hex code is not overly descriptive.

Here we can of course just create our own log capturing script and include it in the task sequence, which is something that I opt for today when working with my clients.

All we have to to is

  • Create a deployment log share and a service account with permissions to the share
  • Add a “Connect to Network Folder” task sequence step to connect to the share
  • Run a PowerShell script at key restart intervals within the task sequence and upon failure to capture the logs

In the above example I had packaged the PS1 script file, however, since Configuration Manager 1902 you can of course just past the entire script in, For example;

Below is a full copy of the log collection script;

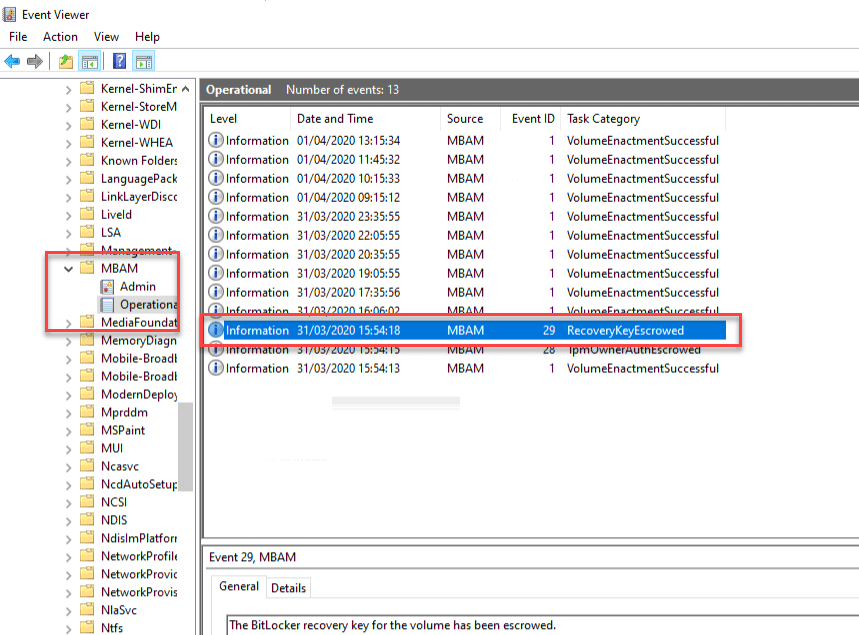
In the end we have the deployment logs saved on a share within a folder created from the OSDComputerName variable;

Computer Naming

The customsettings.ini can of course easily provide a means of generating your computer name. This is of course based on logic that you can obtain from details on the device, if you need something more complex, then something like the ConfigMgr Web service can help.

In the below example we have an automated solution for populating the OSDComputerName variable based on the chassis type and a maximum of 9 characters from the serial number;

[Settings]
Priority=Init, ByDesktop, ByLaptop, Default
Properties=MyCustomProperty,ComputerSerial, ComputerTypeName

[Init]
ComputerSerialNumber=#Right(“%SerialNumber%”,9)#

[ByLaptop]
Subsection=Laptop-%IsLaptop%

[ByDesktop]
Subsection=Desktop-%IsDesktop%

[Laptop-True]
ComputerTypeName=LT

[Desktop-True]
ComputerTypeName=DT

[Default]
OSDComputerName=%ComputerTypeName%-%ComputerSerialNumber%

The result would be with LT-%SERIALNUMBER (First 9)% for a laptop and DT-%SERIALNUMBER(First 9)% for a desktop.

So lets look at how we can take this and translate it into something that we can use in a non MDT integrated task sequence. Here we would need to run something like the below;

$namespace = "ROOT\cimv2"
$classname = "Win32_SystemEnclosure"
Get-WmiObject -Class $classname -Namespace $namespace | Select-Object * -ExcludeProperty PSComputerName, Scope, Path, Options, ClassPath, Properties, SystemProperties, Qualifiers, Site, Container 

Running this we end up with output we can use for system type and for the serial number;

At this point we now have the chassis type, which we can then look up and associate a prefix with. Enclosure values are well documented here – https://docs.microsoft.com/en-us/windows/win32/cimwin32prov/win32-systemenclosure, Jordan Benzing has also recently tweeted about how to use SQL commands to discover computer types using these values – https://twitter.com/JordanTheITguy/status/1238230016678191104?s=20)

Here we are going to focus on the following values;

  • 9 & 10 – Laptop
  • 3,4,6,7 – Desktop

Taking this and adding it to the script we come up with something like this;

Resulting in an output like the below;

Conclusion

To be clear, I am not saying bin your MDT integration. I am not saying that MDT as a solution isn’t good, or that integration can be a good thing in some cases. In fact I still put it in where it serves a purpose as a solution and I do implement MDT for cases like OS rebuilds in an Intune / Autopilot environment.

What I am saying however, is that I have moved on from proposing integration. Native task sequences in my own opinion, offer a cleaner and more manageable solution in the majority of cases.

Keep it simple. Thanks for reading!

(5814)

The post Notes from the field – Do I really need MDT integration? appeared first on MSEndpointMgr.


The case of the expired Cloud Management Gateway (CMG) server authentication certificate

$
0
0

The call

We got a call from a customer stating that they where having issues with their cloud management gateway not working. I did spend some time on figuring out what the issue was so I though I should share it with you all. The customer gave us the following infomation.

  • The status in the ConfigMgr console states the CMG is ready and good.
  • The connection analyzer does clearly states that something was wrong.
  • The SmsAdminUI.log did not really give us much to go on other than go check in Azure Portal.

Finding the issue

Logging in to the Azure portal, opening up the Cloud services (classic) — (yes, CMG is running on a classic service in Azure), I started looking around. The operation log and activity log did not give me much, but when I look at certificates I found that the public certificate used for server authentication was expired.

I asked the customer for a new certificate, and they had one ready (*.domain.com) that I could use to update the cert. So I tried to update the cert from within the ConfigMgr console (properties on the CMG service), but I got an error that the certificate thumbprint was not existing in Azure. It turns out the new cert I got from the customer was not a renewal of their expired cert, but a brand new one. That means it has a different thumbprint, hence I can’t just updated it from the ConfigMgr console.

I then went back to the Azure Portal and uploaded the certificate directly on the cloud service it self.

I then went back into the ConfigMgr console and retried the certificate update from properties on the cloud management gateway.

And surely enough this now succeeds. I went back into the Azure Portal and verified that my cert was still looking good and deleted the expired cert at the same time. Now it was time to rerun the Connection Analyzer on the CMG to verify that all was working OK.

All looking good now.

Summary

CongfigMgr console does not tell us or alert us on expiry of the public certificate for server authentication on the CMG service. I recommend you look into Azure Automation/Azure Monitor to be able to monitor this certificate, or have a clear process and procedure on where the certificate is used. The certificate authority will send massive amounts of email in good time when a cert is about to expire.

Also I recommend that you renew the cert you have instead of creating a brand new one. That will allow you to simply update the cert from within ConfigMgr.

The good thing about this story is that when you have the good certificate in place clients will immediately start communication again. Only a few minutes after I was done I had several clients already online via CMG.

(474)

The post The case of the expired Cloud Management Gateway (CMG) server authentication certificate appeared first on MSEndpointMgr.

Enable Tenant Attach in ConfigMgr with Microsoft Endpoint Manager for device upload and remote actions

$
0
0

Lately there’s been a lot of talk about the newly introduced Microsoft Endpoint Manager solution, that’s aiming for bringing together the best from both worlds, where devices in both ConfigMgr and Intune can be managed from within the same console, the Microsoft Endpoint Manager admin center (MEMAC). In ConfigMgr Current Branch version 2002, the first set of functionality of this integration has surfaced. With this release, devices managed by ConfigMgr can now be uploaded to the back-end cloud services of Microsoft Endpoint Manager, where administrators have the possibility to perform remote actions on all devices within their organization, without having to think about the management authority of the device itself.

This blog post will focus on the configuration parts of setting up the so called Tenant Attach between ConfigMgr and Intune, making management scenario through MEMAC that was mentioned previously possible.

What is Tenant Attach

You may probably have heard about Co-management at this stage, but what is Tenant Attach and is it the same as Co-management?

Co-management has been around for quite a while now, and it aims at enabling targeted workload management from either ConfigMgr or Intune on a given device. A co-managed device is managed by both ConfigMgr and Intune at the same time. Tenant Attach on the other hand is a bit different. Enabling this doesn’t mean that the device has to be enrolled in Intune, it can be either managed by ConfigMgr or Intune, but to make things more interesting devices can also be co-managed. Tenant Attach is simply a way to attach your ConfigMgr hierarchy to your tenant and leverage the capabilities available from the cloud, such as discovery cloud users and groups, synchronize Azure AD groups from a device collection and more.

At writing this blog, the device management capabilities from within the Microsoft Endpoint Manager admin center aren’t that many, but expect Microsoft to pump resources into enabling more management features in the future.

Prerequisites

Before we jump into the configuration parts of this blog post to set everything up, let’s look at the prerequisites for enabling the upload of devices managed by ConfigMgr so that they can be managed from within the MEMAC:

  • ConfigMgr Current Branch version 2002 or later
  • An user with Global Admin permissions is required when setting up the tenant on-boarding within the Co-management configuration item
  • An Azure public cloud environment
  • User accounts that triggers the device actions in MEMAC needs to meet the following prerequisites:

Azure Active Directory user discovery requires you to on-board your Azure AD tenant into your ConfigMgr hierarchy. This configuration is covered very well in the docs from Microsoft and doesn’t need further explanation, but it’s worth mentioning that it’s configured from within the ConfigMgr console under Administration – Cloud Services – Azure Services and the Cloud Management service.

Configure device upload in ConfigMgr

Even though that the enabling of device upload to Intune and manage them from within MEMAC scenario talked about in this blog post isn’t the same as Co-management, it’s configured within the same configuration item (also in the same configuration wizard in the case that Co-management hasn’t been setup in your environment previously). The Co-management configuration wizard has also been updated to let you decide what parts you want it to configure for you when running the wizard. Essentially the Co-management configuration wizard enables you to perform the following two operations, either both at the same time or just one of them:

  • Tenant Attach – enable device upload
  • Co-management – enroll devices into Intune for management by both ConfigMgr and Intune

In this blog post I’ll cover both scenarios on how to set up the device upload for Tenant Attach, when Co-management and device enrollment to Intune have previously been configured and also when it hasn’t.

Enable device upload when Co-management have not been configured previously

Let’s assume that your environment was never enabled for Co-management and device are only managed by ConfigMgr at present.

  • In the ConfigMgr console, go to Administration – Cloud Services and select Co-management. Right-click and select Configure Co-management.
  • Ensure that only the Upload to Microsoft Endpoint Manager admin center check box is selected and click the Sign-in button.

  • Sign-in with a Global Admin account in the authentication prompt that appears and click Next.
  • Click Yes in the prompt to Create AAD Application.

  • Select whether to upload all devices within ConfigMgr or rather a set of devices that’s a member of a specific device collection and click Next.

  • At the Summary page, click Next. Wait for the configuration to complete
  • Click Close once the wizard has completed the configuration

You’ve now configured the device upload functionality. Skip the next section in case you followed the steps mentioned above.

Enable device upload when Co-management have previously been configured

It’s also important to mention, that if you wish to configure only what’s being discussed in this blog post, you don’t need to start enrolling devices into Intune, meaning enabling Co-management fully. We only utilize the same configuration item for Tenant Attach and the device synchronization and remote actions functionality.

  • In the ConfigMgr console, go to Administration – Cloud Services and select Co-management. Open the Properties of the CoMgmtSettingsProd item and go to the Configure upload tab. Click the Upload to Microsoft Endpoint Manager admin center check box.

  • Select whether to upload all devices within ConfigMgr or rather a set of devices that’s a member of a specific device collection.

  • Click OK or Apply. Provide Global Admin permissions in the authentication prompt that appears.

  • Click Yes in the prompt that appears to register an application in your Azure AD tenant that will be used to authorize the synchronization of data to Intune.

  • If you clicked Apply, the required configuration is now done, so click OK to close the Properties window.

Device upload App registration

What actually happened in the back-end when asking for registering an application in Azure AD on-behalf of your organization? In the Azure portal under App registration in Azure AD, you should see an application that’s named according to the ConfigMgrSvc_<GUID> naming scheme, looking similar to this:

In the event when you’d attach multiple ConfigMgr hierarchies to your tenant, in the ConfigMgr console under Administration – Cloud Services – Azure Active Directory Tenants and the Applications section you’ll see which application name is being associated with the respective ConfigMgr environment:

What’s going on in the background

In the ConfigMgr logs directory on the Site server there’re two log files to make a note of where what we’ve configured up until this point will be logged, these are:

  • CMGatewayNotificationWorker.log
  • CMGatewaySyncUploadWorker.log

If we look in the CMGatewaySyncUploadWorker.log, we can see that it detected that 21 devices was to be uploaded to Intune:

That correlates to the amount of devices currently in this environment that I’m using to set this up:

Under Administration – Cloud Services – Azure Services in the ConfigMgr console, there’s a new Cloud Attach service that has been added. There’s no configuration options for it, it just sits there doing it’s thing:

Invoking remote device actions for uploaded devices

From within the Microsoft Endpoint Manager admin center (devicemanagement.microsoft.com) under Devices – All devices, all devices that was uploaded from ConfigMgr are now visible to be remotely managed:

As the screenshot shows, it’s also so now possible to see your Windows Servers in the admin center, pretty cool right? In the view above, devices have been filtered on the Managed By attribute of ConfigMgr, to easily being able to distinguish what devices are managed by which platform. Unfortunately you can’t view the uploaded devices through the Devices – By Platform (Windows) – Windows devices as of yet, but I’m assuming that will be added in the future.

Clicking on any of these devices takes you into slightly different device blade that gives an overview of the device but also shows what remote device actions that can be triggered:

As you can see, the options are not that many as of yet, but to demonstrate the functionality, let’s trigger a Sync Machine Policy and follow the logs to see what goes on behind the scenes:

In the CMGatewayNotificationWorker.log on the Site server you’ll notice that a new notification was received and that it then triggered the machine policy sync using the BGB channel (also known as the Fast channel):

Looking further in the PolicyAgent.log locally on the MBAM01 server (that’s the server that I chose to trigger the machine policy sync on) the log shows that a sync was indeed triggered:

Summary

If we just sit down for a minute and think of what we’ve talked about in this blog post, cause it’s pretty darn impressive. Essentially, we’ve taken devices (even servers) managed only by ConfigMgr, uploaded or rather synchronized with Microsoft Endpoint Manager (or actually Intune), seen the device from within the MEMAC portal and initiated a machine policy refresh that within a seconds trigger the action locally on the server. Now if you don’t think that’s cool, think again. I can’t wait to see what’s in store for the future with and what’s going to come out from Redmond around this integration between ConfigMgr and Intune from within the Microsoft Endpoint Manager admin center.

(1154)

The post Enable Tenant Attach in ConfigMgr with Microsoft Endpoint Manager for device upload and remote actions appeared first on MSEndpointMgr.

Goodbye MBAM – BitLocker Management in Configuration Manager – Part 1

$
0
0

Back in January 2019 I wrote a series on setting up and customising MBAM (https://msendpointmgr.com/2019/01/12/step-by-step-microsoft-mbam/), a product that was part of the Microsoft Desktop Optimisation Pack, and a product that at the time was earmarked for retirement. At the time there were rumors’ that functionality would be imported into Configuration Manager, something that we learned was true with the introduction of MBAM functionality in TP 1908.

Series Links
Goodbye MBAM – BitLocker Management in Configuration Manager – Part 1 (Server Components)
Goodbye MBAM – BitLocker Management in Configuration Manager – Part 2 (Portal Customisation)
Goodbye MBAM – BitLocker Management in Configuration Manager – Part 3 (Client Encryption)

New in Configuration Manager Build 2002

Fast forwarding to today, with the release of Microsoft Endpoint Configuration Manager build 2002, MBAM functionality has been migrated in full. In this blog post series I will step through the setup process, how to integrate the new service into your task sequence, and how to customize the self service portal.

This is actually more, Goodbye MBAM standalone, as full integration has been completed.

The Setup Experience

To start of we need to have a couple of pre-requisites out of the way;

  • Configuration Manager build 2002 installed
  • Microsoft ASP.NET MVC 4.0
  • Certificate Authority PKI* 
  • Three security groups;
    • BitLocker Helpdesk Admins
    • BitLocker Reporting Users
    • BitLocker Admin Users
  • MBAM Deployment Script
Upgrading Configuration Manager

This is something we are all familiar with, but just for those new to this process, here we go

  • Launch the Configuration Manager console
  • Click on the Administration blade
  • Click on Updates and Servicing
  • You should now see Configuration Manager 2002 listed as available for install. If you do not see this, click on the “Check for Updates” button and then try again later

  • Perform a full backup of your existing environment (see https://docs.microsoft.com/en-us/configmgr/core/servers/manage/backup-and-recovery)
  • Click on Install Update Pack
  • After some time, the update will complete;

  • You will at this point need to update the Configuration Manager console, and you will be prompted to do so in order to continue
  • Logging back in and going to the About page, you can see the updated build information;

SQL Encryption

As you are going to store the recovery information for all BitLocker machines managed through Configuration Manager, data encryption might be a concern. If this is a requirement, then it is possible through SQL cell-level encryption, however, do note that this has the potential to cause up to a 25% performance degradation in SQL DB performance.

For more information on how to achieve this through certificates in SQL, along with the SQL versions supported, visit this page on the docs site – https://docs.microsoft.com/en-us/configmgr/protect/deploy-use/bitlocker/encrypt-recovery-data

The MBAM Web Portals

Installation of the MBAM portals (yes they are still MBAM branded, just migrated) in this example is on a single management point, which is not running SSL. In the previous 1910 release, which saw the initial availability of MBAM features, the use of HTTPS was a requirement which caused issues for those not running their infrastructure in full HTTPS mode. In the latest 2002 release however, only the associated MBAM sites need to be HTTPS enabled, meaning you no longer need to undertake a lot of pre-requisite work to push out this feature.

In this instance the MBAM portals are not actually installed as a feature, as you might imagine they would, but through a PowerShell script. So let us proceed and install the web components;

  • First of all we will need to download and install the Microsoft ASP.NET MVC 4.0 prerequisite for the Self Service portal to work
  • Download the setup file from https://www.microsoft.com/en-ca/download/details.aspx?id=30683 
  • Launch the installer and step through the setup process;

  • In Active Directory, we will need to create three user groups that will be used to define access functions to the helpdesk and reporting portals;
    BitLocker Helpdesk Admins
    BitLocker Reporting Users
    BitLocker Admin Users
  • Once installed open an administrative PowerShell window and go to the following location – %PATH TO YOUR CONFIGURATION MANAGER INSTALL%\CD.Latest\SMSSetup\Bin\x64
  • Now run the following command;
    .\MBAMWebSiteInstaller.ps1 -SQServerName %YOURSQLSERVER% -SQLDatabaseName %YourDBName% -ReportWebServiceURL “https://YOURREPORTINGSERVER/ReportServer” -HelpDeskUsersGroupName “DOMAIN\BitLocker Helpdesk Users” -HelpdeskAdminsGroupName “DOMAIN\BitLocker Helpdesk Admins” -MBamReportUsersGroupName “DOMAIN\BitLocker Report Users” -SiteInstall Both -DomainName “YOURFQDN”
  • Below is an example of this command being run in my lab;

  • At the end of the script being run, you will have completion messages with the paths to the new IIS virtual directories;

  • At this point, going into IIS Manager, we can see the virtual directories are present;

Default Portal View

With the portals now installed, we can test functionality over HTTP and later add in HTTPS which will be required to escrow the recovery keys.

You can open the self-service portal which will be used by employees (fingers crossed) in order to recover their BitLocker keys as part of self service;

Now we can also test access to the Helpdesk portal, which obviously will be used by members of the IT Helpdesk;

For those of you who are used to MBAM, these will obviously be very familiar as they are a direct port from the product. I will run through how to customise the self service portal in part 2 of this series.

Enabling HTTPS  – Cert Creation and Installation

If you are running HTTP only in your environment, we now enable SSL for these individual sites. At this stage you will need a CA signed certificate which will be bound to port 443 on your IIS instance running on your Management Points.

Note: If you have a HTTPS enabled environment, you can skip over the cert creation and installation steps.

I will step through how to create and add your SSL certificate here;

  • Create a new Active Directory security group and add your Management Point to the group, example;

  • On your Certificate Authority, right-click on Certificate Templates and go to Manage
  • Right-click the Web Server template and click “Duplicate Template
  • Name your Certificate, in this example I have used “ConfigMgr IIS Certificate”;

  • On the Security tab, add the AD group you created earlier and assign the enroll permission;

  • Click OK
  • Close the Certificate Templates Console
  • Right-click on Certificate Templates in the Certificate Authority Console, click New, Certificate to Issue
  • Select the template name you created
  • You should now see your template is available;

Now that we have a template to use, we need to assign a certificate to the management point.

  • Open the IIS Management console on your management point
  • Highlight the server name and double-click on Server Certificates;

  • Click on the “Create Domain Certificate” action
  • Enter the required details as per the below example;

  • Select your internal CA and give your certificate a friendly name;

With the certificate created and listed, we can now bind it to port 443 for SSL communications.

  • Click on “Default Web Site” in the IIS admin portal
  • Click on “Bindings” in the actions pane
  • Double-click on “https” and select the certificate you just provisioned from the SSL certificate list;

Enabling HTTPS – Individual Sites

It is a requirement to run HTTPS for escrow of the keys, as I already mentioned. Here in the latest 2002 implementation of the BitLocker management feature, we simply need to enable this on the individual sites in IIS Manager. This can be achieved by undertaking the following actions;

  • Open IIS Manager
  • Select the HelpDesk virtual directory underneath in the “Default Web Site” list
  • Double-click on SSL Settings and click on the “Require SSL” checkbox, then underneath Client Certificates click “Accept“;

  • Repeat this process for the SelfService and SMS_MP_MBAM sites
  • Restart IIS using IISReset from an administrative command prompt or PowerShell window

You can now test accessing the sites over HTTPS;

Conclusion

At this state we have the background components enabled to support BitLocker management in Configuration Manager. In the next parts of this series we will look at customisation of the self service portal and how to deploy settings to the Windows clients, enforcing encryption in your organisation.

Continue to part two

(5029)

The post Goodbye MBAM – BitLocker Management in Configuration Manager – Part 1 appeared first on MSEndpointMgr.

Goodbye MBAM – BitLocker Management in Configuration Manager – Part 2

$
0
0

In part two of this three part series, I will run through how to customise the BitLocker Self Service portal in Configuration Manager build 2002.

Series Links
Goodbye MBAM – BitLocker Management in Configuration Manager – Part 1 (Server Components)
Goodbye MBAM – BitLocker Management in Configuration Manager – Part 2 (Portal Customisation)
Goodbye MBAM – BitLocker Management in Configuration Manager – Part 3 (Client Encryption)

IIS Customisation Options

With the self-service portal installed, the first thing we can do is use IIS manager to edit some of the basic text displayed in the portal.

Custom HTML Work

The issue with the self service portal however, is it feels a little bit, early 2000’s. So in order to make the portal feel a bit more up to date, we can simply go down the path of editing the HTML mark up of the portal itself, including adding corporate logos.

The Self Service Portal

The self-service portal provides end-users with a quick means of recovering their BitLocker recovery password in the event of a recovery event being triggered. Let us go ahead and validate that the component was successfully installed;

  • Launch a web browser and browse to the following URL – https://YOURSERVER/SelfService

  • At this point we have the generic experience where some elements can be controlled within IIS
  • Open the IIS Manager console, select the SelfService virtual directory and go to Application Settings;

  • Now we can edit basic settings in the UI;

  • From here we can do things like setting the company name and deciding if we want to display a notice to users by editing the notice.txt file, or hiding the initial page by setting the DisplayNotice to False.

Fully Customising The Self Service Portal

If you wish to fully customise the portal however, you will need to edit the site master layout and the CSS file for the site. By doing this you can achieve a less generic look;

To do so, simply follow the below;

SITE Style Sheet
  • Browse to the following location – C:\inetpub\Microsoft BitLocker Management Solution\Self Service Website\Content
  • Create a backup of the Site.CSS style sheet
  • Open the Site.CSS style sheet
  • Now you can remove the gradient background by changing the following;body
    {
    font-family: “Segoe UI”, Verdana, sans-serif;
    font-size: 14px;
    color: #333;
    background: #DFF2F9 url(images/BrowsersBkgd_repeat-x.jpg) top left repeat-x;
    margin: 0px;
    }
  • Next update the background colour with your preferred colour in hexadecimal format
  • In this example #DFF2F9 is replaced with #FFFFFF for a white background;body{
    font-family: “Segoe UI”, Verdana, sans-serif;
    font-size: 14px;
    color: #333;
    background: #FFFFFF ;
    margin: 0px;
    }
  • In order to give the header block a contrasting background, locate the following section of code;#header
    {
    display: block;
    }
  • Add a background entry with your background colour again in hexadecimal format, you should then have a section like the below#header
    {
    display: block;
    background: #454442;
    }
Adding A Custom Logo

In order to add an image with your organisations logo you will need obviously first of all to create and size your logo. In the example shown below I have used a pixel height of 120 and colour matched the background;

Now to insert the logo;

  • Save the image file to the following location;
    C:\inetpub\Microsoft BitLocker Management Solution\Self Service Website\Content\Images
  • Browse to the following location and create a backup of the Site.Master filer;
    C:\inetpub\Microsoft BitLocker Management Solution\Self Service Website\Views\Shared
  • Open the Site.Master in a text editor
  • Scroll down to the following section;<div id=”header”>
    <div class=”content”>
    <% Html.RenderPartial(“UserIdentityControl”); %>
    <br/>
    <% Html.RenderPartial(“UserLogoutControl”); %>
    <h1>
    <asp:Literal runat=”server” Mode=”Encode” Text=”<%$appSettings:CompanyName %>” />
    </h1>
    </div>
    </div>
  • Add the HTML image tags and comment out the text company name as per the below;<div id=”header”>
    <div class=”content”>
    <% Html.RenderPartial(“UserIdentityControl”); %>
    <br/>
    <% Html.RenderPartial(“UserLogoutControl”); %>
    <img src=”<%= Url.Content(“https://lab-mbam.scconfigmgrlab.local/SelfService/Content/Images/SCConfigMgrBackgroundLarge.png”) %>” alt=”SCConfigrMgr Lab Environment”>
    <!–
    <h1>
    <asp:Literal runat=”server” Mode=”Encode” Text=”<%$appSettings:CompanyName %>” />
    </h1>
    –>
    </div>
    </div>

Conclusion

At this point you should now have a more custom look to your self service portal. Now its time to look at how we put everything together for the Windows 10 client in part three.

(978)

The post Goodbye MBAM – BitLocker Management in Configuration Manager – Part 2 appeared first on MSEndpointMgr.

Goodbye MBAM – BitLocker Management in Configuration Manager – Part 3

$
0
0

In this, the final part of the series, we look at how the MBAM client and settings are deployed in the 2002 release of Configuration Manager.

Series Links
Goodbye MBAM – BitLocker Management in Configuration Manager – Part 1 (Server Components)
Goodbye MBAM – BitLocker Management in Configuration Manager – Part 2 (Portal Customisation)
Goodbye MBAM – BitLocker Management in Configuration Manager – Part 3 (Client Encryption)

The Agent & Policy Settings

As this is for the most part a straight port of the MBAM solution, we still need to deploy an MBAM client in order for the Windows 10 device to understand the settings being deployed and start the encryption process.

The first thing we need to do, is to set up a BitLocker policy as this controls the installation of the MBAM client. You will find the BitLocker policy in the Endpoint Protection settings in the Assets and Compliance blade;

So lets start with configuring a new policy

  • Open the BitLocker Management section in Endpoint Protection settings
  • Click on New Policy
  • Name your Policy

  • Click on Operating System Drive options and specify the type of encryption you wish to use, in this example we are using TPM only and XTS-AES256 bit encryption;

  • Click on Client Management, then enter your BitLocker key recovery options and status frequency in minutes;

  • Should you wish to specify settings for additional data drives or removable drives, do so accordingly
  • Now we can deploy the profile

  • Upon assignment of the policy, the Configuration Manager client will install the MDOP MBAM agent on the targeted machines, if not already installed. The agent is actually located within the %SYSTEMROOT%\CCM folder, as part of the updated client agent;

  • Once the agent is installed it will look for the BitLocker policy assigned to the device through Device Collection membership, and then pull down the configuration accordingly.
  • We can see this process taking place within the registry, by looking for a registry key starting in HKLM:\Software\Policies\Microsoft\FVE.
  • Once the agent is installed, the initial registry item settings are written in, as per default values;

  • After a few minutes, the additional policies set within your policy should also appear in a “MDOPBitLockerManagement” subfolder;

  • We can also check the Configuration Manager client agent to see that the settings are targeted and if the machine is compliant, by looking at the compliance tab;

Note: MBAM policies by default will enforce encryption after 90 minutes. Should you wish to speed this process up and enforce silent encryption immediately, you can simply create the following registry entries on your device either through a group policy preference or through a Configuration Baseline;

Registry Key Path: HKLM:\SOFTWARE\Policies\Microsoft\FVE\MDOPBitLockerManagement
Item Name: OSEnforcePolicyPeriod
Data Type: DWORD
Value: 0

Registry Key Path: HKLM:\SOFTWARE\Policies\Microsoft\FVE\MDOPBitLockerManagement
Item Name: UseOSEnforcePolicy
Data Type: DWORD
Value: 1

The Encryption Process

In the Applications and Services event logs we can look at the following log – Microsoft\Windows\MBAM. Here we will see the policies taking effect on the machine, along with the escrow status of the TPM and BitLocker recovery keys;

Task Sequence Deployment

For deployment of new systems, obviously we do not want to wait for device collection evaluation to run before the drive is encrypted. So the process of encryption here for those who have used MBAM, is almost identical, but for those who have not, let us step through this.

Package Up Deployment Scripts

Here we can simply leverage the Invoke-MBAMClientDeployment PowerShell script as the MBAM client itself is now installed

  • Download the MBAM Client Deployment Scripts from this location – https://www.microsoft.com/en-us/download/details.aspx?id=54439
  • Extract the files contained within. We will later use two of these files to first of all persist the TPM owner and then to enforce the encryption process
  • Create a new Package
  • Give your package a name, “MBAM Deployment Scripts” for example

  • Distribute your package to your DP’s
The Task Sequence

With the application and script package in place, we can go ahead and add these to our task sequence.

  • Create or edit and existing task sequence
  • Create a group within the Windows PE stage and call it BitLocker Pre-Provisioning (or something similar)
  • Add a Run Command line step, call it “Set BitLocker XTS AES 256”  and enter the following details;
    “reg add HKLM\SOFTWARE\Policies\Microsoft\FVE /v EncryptionMethod /t REG_DWORD /d 7 /f”

  • Add a Pre-Provision BitLocker step to speed up the encryption process and help to ensure your machine is encrypted after OS deployment has completed (More info here – https://docs.microsoft.com/en-us/configmgr/osd/deploy-use/preprovision-bitlocker-in-windows-pe)

  • Add a new Run Command Line step, name it “Persist TPM  OwnerAuth” and enter the following (this is required as we are pre-provisioning the drive and want the TPM owner persisted through to the full OS)
    cscript.exe “SaveWinPETpmOwnerAuth.wsf”

  • This step is OPTIONAL. Here we will also escrow the BitLocker recovery key to Active Directory, prior to escrowing the key;

  •  Add a Run PowerShell Script step, enter “Invoke-MBamClientDeployment.ps1” as the script name and select the MBAM Deployment Script package. Now enter the following parameters;
    -RecoveryServiceEndpoint “https://%YOURSERVER%/SMS_MP_MBAM/CoreService.svc” -EncryptionMethod “XTSAES256” -EncryptAndEscrowDataVolume -IgnoreEscrowOwnerAuthFailure -IgnoreReportStatusFailure -WaitForEncryptionToComplete

Monitoring the deployment via the status messages for the deployment, we can see the key was successfully escrowed to the Configuration Manager database;

Validating The Recovery Process

With your machine now deployed or having taken control of management of the device, we can now look at ensuring the keys are present in the database. So first of all we can run the manage-bde command on our Windows 10 device to obtain the BitLocker recovery key;

  • Open a Command Prompt or PowerShell Window and type; Manage-BDE -Protectors -Get C:

  • Now we have three options to verify if the key is in the database. The first is to look at the database table – dbo.RecoveryAndHardwareCore_Keys

  • The second is to use the Helpdesk portal, by logging onto our server – https://%YOURSERVERHERE%/HelpDesk;

  • And finally the last option is to use the SelfService portal – https://%YOURSERVERHERE%/SelfService;

  • Optionally if you opted to escrow the keys to Active Directory, we can verify storage there;

In the above AD Computer Object screenshot you will also see that the recovery key was rolled over during testing, something which MBAM handles to ensure you can’t re-use keys.

Testing Recovery

With the recovery keys stored, we can now go about testing a recovery scenario. First of all we need to force recovery of the drive by running the following command;

Manage-BDE -ForceRecovery C:

Now we can obtain the recovery key either through the self service portal or through the helpdesk (as per this example). Using the recovery key, your machine should then boot as normal;

Migration from MBAM Standalone to Configuration Manager

The process of moving active devices from MBAM standalone to Configuration Manager can be handled in this manner;

  • Remove the existing MBAM group policies from the OU where the machines are located
  • Assign the BitLocker policy you created in Configuration Manager to a device collection containing those machines
  • Wait or force the policies to update both for Group Policy and the machine policy
  • Check the event logs and you see the machine communicating and then escrowing the keys;

  • Confirm the new server settings in the registry;

  • At this point you can confirm that the keys are located in both environments;

Conclusion

At this point you should now be able to deploy the entire solution, securing your portal via HTTPS, customising the self service portal, and of course having the ability to deploy your machines and automatically having them encrypt their drives while escrowing the recovery keys to the database. Now to go about retiring out that old MBAM server..

Thanks for reading.

(1599)

The post Goodbye MBAM – BitLocker Management in Configuration Manager – Part 3 appeared first on MSEndpointMgr.

WIM Witch 2.0 – ConfigMgr Integration

$
0
0

The most requested feature for WIM Witch has been integration with Configuration Manager, and I am pleased and proud to announce this request has been fulfilled. WIM Witch now has the ability to create a new operating system image in ConfigMgr, as well as updating an existing image.  Just like with previous versions, the ConfigMgr image criteria can be saved and used for both GUI and command line use. In addition to the image maintenance capabilities, WIM Witch can now use ConfigMgr as the update catalog. Using ConfigMgr as the update catalog negates the need to install and update the OSDSUS and OSDUpdate modules, and allows for updates to be downloaded on-the-fly during the image build process.

Prereqs and Start Up

To use the ConfigMgr integration with WIM Witch, she must be installed on a site server with the SMS Provider site server role. This is commonly the primary site server, but may be a different server, so please verify the role is installed.

WIM Witch is dependent on the PowerShell module for ConfigMgr, and she will attempt to import it automatically. Currently, WIM Witch will search four paths ([C,D,E,F]:\Program Files (x86)\Microsoft Configuration Manager\AdminConsole\bin\ConfigurationManager.psd1) in attempt to import. If the module is not in one of those four locations, the importation will fail.

  • I am working on a better solution for this mechanism and will it be improved in the a subsequent release.
Detecting and enabling ConfigMgr Integration

If WIM Witch is not able to detect the site code, site server name, or import the PowerShell module, it will set the update catalog to OSDSUS, which will provide the same functionality as previous releases.

ConfigMgr was not detected. Setting OSDSUS as the update catalog.

To migrate a previous WIM Witch installation to the ConfigMgr server, simply copy the folder that contains the current installation to the ConfigMgr site server and run WIM Witch from there.

Making It So, with ConfigMgr

Source WIM

To get started, select a source wim file as usual.

The only thing new on the tab is the select button lines up with the Edition field.

Update Catalog

The Update Catalog is where one can change the preferred update catalog source to either OSDSUS or ConfigMgr. If using ConfigMgr integration, downloading new updates prior to building an image is now optional. There isn’t much to do on this tab if ConfigMgr is the update catalog.

Not much to do here…

When using ConfigMgr as the Update Catalog, certain updates will be flagged as “Optional” and will not be downloaded or applied. These “Optional” updates are ones that are not Servicing Stack, Cumulative, .Net, or Adobe related updates.  This behavior is equivalent to OSDSUS as these updates are not intended for installation on every system.

Showing Optional Update behavior
  • If there is sufficient demand to allow these updates to be managed with WIM Witch, this behavior can be modified in later releases. Just let me know.

If OSDSUS has been selected as the update catalog, and the modules are out of date or if PowerShell must be closed, WIM Witch will display the information in the box at the lower right of the window. This replaces the big, ugly text that was displayed in prior versions. The requirement of pre-downloading updates has not changed and will need to be performed.

I am so happy to finally have proper notifications. Seriously, the old ugly text bothered me.

Customizations

There isn’t anything new here, and the requirement to select “Enable Updates” still remains if updates should be applied.

Make any additional customizations as needed. This also includes selecting the APPX packages to remove. There were no changes to either of these behaviors, so screen shots were not included.

ConfigMgr

On the ConfigMgr tab, the first thing to address is if this will be a new image or and update to an existing image. If the default option of “Disabled” is selected, WIM Witch will not interact with ConfigMgr and will make the WIM file as she has in previous versions. If New Image is selected, a new image will be created in ConfigMgr from the WIM file created. If Update Existing Image is selected, WIM Witch will update an image already in ConfigMgr. Make the appropriate selection in the combo box.

The version and description fields can be populated with custom information. If selecting “Existing Image”, these fields will be populated with existing text of the image property. These can be updated if desired.

When updating an existing image, the previous version of the selected image file will be backed up in the image’s folder. The image file is renamed to the existing image name plus a time stamp. WIM Witch is not managing old backups, and it is advisable to monitor the path storage as bloat will occur as images are updated.

If selecting New Image, either Distribution Point or Distribution Point Groups can be chosen to distribute the image to.  Once the proper option is selected, click Select. A grid view will provide a list of the available DP’s or DPG’s. Select the appropriate option.

New Image selected – Showing Distribution Point drop down option.

To update an existing image, make the selection in the drop down option. Then, click the “Select Image” button. This will present an out-grid window with the images available in ConfigMgr. Select one, then click OK. Once the image has been selected, the Image Name, Package ID, Image Version, Description, Distribution Points, File Name, and File Location fields will all be populated with the relevant information.

If selecting Existing Image, the current DP’s that have the content are listed. At this time, the DP’s for an existing image can not be modified by WIM Witch. If additional DP’s should have the image, it will need to be distributed from the ConfigMgr console.

Update Existing Image selected.

You can also select the checkbox to enable Binary Differential Replication with either the New Image or Existing Image options.

  • BDR was chosen only because I was unsure what options would be the most useful. If there are options you are using that you would like to see in this tab, shoot me a message. I am open to suggestions.

Make It So

On the Make It So tab, the name of the wim will need to be supplied, along with the path as normal. If Existing Image was selected on the ConfigMgr tab, these two fields will be auto-populated. If selecting New Image, they will need to be entered manually.

  • Please note that the Select button that opens a folder browser dialog box does not support UNC paths, which are required for an operating system image. In this case the path will need to be entered manually until such time that my scripting skills improve.

If it is desired to have WIM Witch check for new updates while running the build process, check the box next to the Make It So button labeled “Check for updates when running”. This checkbox will only be available if ConfigMgr is selected as the Update Catalog source.

Make It So, with the “Check for updates when running” option selected.

Save / Load

If leveraging the Save feature of WIM Witch, the configuration can be called from command line. If using this option, please do not use the update parameters as they are intended for use with OSDSUS and not ConfigMgr. All that is required to download new updates is to ensure the “Check for updates when running” checkbox is selected when saving the configuration. All options will be recorded by the save function, and applied when running.

That’s all you need

Bugs, Notes, and Mad Ramblings

This was my first attempt at forking code, and I did so with the 1.5.0 release of WIM Witch. I merged the code from 1.5.3 to the 2.0.0 branch, but until this release is fully tested by the community, there are likely to be regressions. If WIM Witch is part of a critical solution, continue to use 1.5.3 for the near future. If bugs are found, let me know. If you try 2.0.0 and want to revert, WIM Witch backs up the previous version’s script file in the backup folder. Find the most recent file, rename it, and move it to the appropriate folder.

There are two bugs that I know about.

-When switching from Update Existing Image to New Image on the ConfigMgr tab, the list box for DP’s is not cleared. The entries can be removed with the remove button, but it may be advisable to close WIM Witch and reload if the list box does not clear as desired.

-The path field on the Make It So tab does not allow the user to browse for a UNC path. I’ll be working on this as the current workaround is a little hokey.

I am looking forward to hearing the feedback from the community and improving this new feature set. Please, let me know what you think.

(883)

The post WIM Witch 2.0 – ConfigMgr Integration appeared first on MSEndpointMgr.

WIM Witch – v2.1 – Minor, Yet Major, Updates to ConfigMgr Integration. Plus, Windows 10 2004

$
0
0

Author’s note: The release of Win10 2004 came before I had this post ready. As the code was ready, I opted to release the latest build to give users the ability service the new image without providing instruction.

This release of WIM Witch brings minor functionality enhancements to the user experience, and lays the foundation for ConfigMgr integration yet to come.

Auto Fill

ConfigMgr provides two places for administrators to provide metadata about the Operating System Images, Versions and Comment (Description).

The “Version” and “Description” (Comment) fields

These fields are typically left for admins to fill out themselves. While they can be useful, generally they aren’t used. WIM Witch v2.0 allowed admins to manually populate these fields from within the WIM Witch UI, which can be handy, but v2.1 makes them useful.

Three new check boxes. The Auto Fill check boxes, plus the Enable Deployment Share check boxes are new

With v2.1, checking the boxes labeled “Auto Fill” next to “Image Version” and “Description” will automatically populate these fields with metadata about the creation of the image. Version will be populated with a timestamp of when the image was finalized by WIM Witch, which provides admins a reference for how old the image really is.

The Description Auto Fill option populates the field with a list of customizations that were selected for the image creation. While not a granular list, it will easily tell the admins if OneDrive has been update, Software Updates applied, Language Packs injected, and more. At this time, she does not show exactly which updates were applied, nor specific LP’s, but that may be coming at some point in the future. For now, we can get an automatic high-level view of the image without having to look at logs.

Showing what the “Auto Fill” options can do. Yes, there is a typo.

Enable Deployment Share

By checking this box, every Distribution Point that has the image distributed will also add a Deployment Share for the content. While this feature may not be widely used, there were requests for it and it was a worthwhile deep-dive into the bowels of WMI to figure out how to make it work. Look for the option to name the deployment share in a future release.

Windows 2004 Support

Microsoft released Windows 10 2004 late in May, and WIM Witch v2.1 adds support for this new version. While everything should work, this version of Windows 10 is still new, so it’s possible that a few bugs need to be worked out. If bugs are encountered, please let me know. WIM Witch is nothing without her users, especially those that provide feedback!

The Prelude to Greatness

For those who have already tried out v2.1, the best feature is not obvious to discern. There are no check boxes, fields, or configurable items to give it away. Besides the mentioned features above, there is nothing new in the WIM Witch UI.

V2.1 introduces an automatic function that catalogs every configuration selected when building a new or updating an existing ConfigMgr OS Image. After either a new CM image is created or an existing one updated, a folder will be created in the WIM Witch folder structure.

The new folder lives between “CompletedWIMs” and “Configs”. See if you can find it…

In this folder, a file is saved that is named after the Package ID of the image. This file will now be automatically loaded when an image is chosen for updating, so long as WIM Witch has already created or updated said image. If the image file with the Package ID has not yet been created, the old default behavior will take precedence.

This means that admins who are using CM integration no longer have to select a Source WIM, choose customizations, or select items each time they wish to update an image. Every chosen option from the previous build will be loaded automatically. Any changes made to the customizations will automatically be saved when the new build is completed.

In effect, admins just need to select the image to update and hit “Make It So”.

The Hidden Agenda

So besides saving the average Admin 5-10 mouse clicks, why is WIM Witch remembering the selected customizations so exciting? This functionality lays the groundwork for ConfigMgr console integration.

Coming soon to a WIM Witch near you

All that will need to happen from the console is to select an image, and have the as-of-yet-unwritten plugin pass the Package ID to WIM Witch as a command-line parameter. She’ll know exactly what to do. Granted, this is easier said than done. I need to figure out how to write a console plugin first, and that is likely to take some time. But like everything else in WIM Witch, I didn’t know how to make it happen until it was written, and this challenge is just the same. And its a challenge I have been waiting to tackle since I started writing her.

This version, while small on new features for the admin today, has paved the way for excellence in the future. I am excited that I have brought her this far, and I can’t wait to have her fully CM integrated in the near future.

(2179)

The post WIM Witch – v2.1 – Minor, Yet Major, Updates to ConfigMgr Integration. Plus, Windows 10 2004 appeared first on MSEndpointMgr.


WIM Witch v2.2.0 – Start Menu, Default App Association, and Reg File Support

$
0
0

tl;dr – New features introduced in a new tab. Let me know if you find any bugs.

This release of WIM Witch brings a new tab to the interface, and three new options to make offline servicing even more convenient. She can now import the default application association XML, stage a Start Menu layout XML file, and import registry settings from exported REG files..

The new settings can be found under the “Other Custom” tab.

Behold! The Other Custom tab.

Default Application Association

To leverage this feature, one must already have a XML file exported from a Windows reference machine in order to import the configuration into the offline image.

For information on how to export the file from a reference machine, see this link

Click the check box to enable the Default App Association feature. Then click select and browse to the XML file and click OK. The path and file name will be displayed.

Start Menu Layout

To leverage this feature one must have already exported a Start Menu layout xml file from a Windows reference machine.

For information on configuring and exporting the Start Menu layout template, see this link

Click the check box to enable the Start Menu layout feature, then click the select button. From there, simply select the XML file. If the name of the file is not “Layout Modification.XML”, WIM Witch can apply the layout, but will rename the file during the build process. This behavior will be noted in the log and console output.

Registry Keys

WIM Witch can now import registry keys from exported REG files. As with the other new features, the required files will need to have already been exported from a reference machine. Click the check box to enable the feature, then click select. The UI allows for multiple files to be added from a single folder.

The current support for the exported registry settings are for:

  • HKLM\Software
  • HKLM\System
  • HKCU
  • HKU\Default

Make It So

Once the required files have been selected, the options are ready to Make It So.

All options selected

Below is a screen grab of the output regarding the new features during the build process.


The relevant bits from Making It So

Existing Saved Configurations and CM Package Info

For users with existing configurations saved or those updating images in ConfigMgr, some intervention will be required to update these saves with the new capabilities.

For config files, load one from the Save/Load tab, then select the new options under the Other Custom tab, and then save the configuration.

For updating ConfigMgr images, select the image package from the ConfigMgr tab. Once the values have been loaded, select the new features from the Other Custom tab, then click Make It So. The changes will be saved automatically.

Of course, if the new features are not needed, there is nothing to do.

(1062)

The post WIM Witch v2.2.0 – Start Menu, Default App Association, and Reg File Support appeared first on MSEndpointMgr.

Deploy Microsoft 365 Apps with “no content”

$
0
0

You most likely know how to deploy applications from ConfigMgr. Usually, you would package all the source files in a single folder to build our deployment. But when it comes to configuring and deploying Microsoft 365 Apps (previously known as Office 365 Pro Plus), there are multiple ways of doing it:

  • Downloading the source files and host them on a UNC path.
  • Package them and deploy them from Microsoft Endpoint Manager Configuration Manager.
  • Use the built-in Office 365 deployment feature of Microsoft Endpoint Manager Configuration Manager.
  • Use Microsoft Endpoint Manager Intune.

Now that a lot of your users are working from home, deploying applications from ConfigMgr via VPN is a big challenge for many system administrators! That is unless you have configured a Cloud Management Gateway and enabled a cloud distribution point or have MDM with Microsoft Intune.

The fully downloaded Microsoft 365 Apps installation source files contain about 3GB data, imaging how long it takes for your users to download this big package over a slow VPN network and the load it would put on the infrastructure.

If you are not using Microsoft Intune, or a CDP enabled CMG, there is another way you can choose to go called:

Office Content Delivery Network (CDN)

The concept here is to deploy only the setup.exe and configuration XML file, then let the endpoints download all the necessary content from the Office Content Delivery Network (CDN) via the user’s ISP. Of course, this will require split-tunneling VPN (i.e. Always On VPN, Direct Access, or any other third party solutions that support split-tunneling). If you don’t have split-tunneling VPN, you will need to ask users to disconnect their VPN when they see the Office installation starts, otherwise, this “no content” package won’t help reduce VPN network load.

Before you start, please find time to read this post Office 365 client deployment: notes from the field. It will help you prepare for upgrading to Microsoft 365 Apps.

NOTE: At the end of this post, you will find a ready-made example on my GitHub account. However, I would suggest that you make your configuration.xml file with your desired settings.

Step 1: Download the Office Deployment Tool

Search for the “Office Deployment Tool” using your favorite search engine. Download and run the installer to extract the toolkit to a folder (i.e., C:\Temp\Office).

ODT Installation EULA

Step 2: Create a configuration file

The easiest way is to use the Office 365 Client Configuration Service via https://config.office.com/ to configure the desired settings.

Remember to choose the installation option called “Office Content Delivery Network (CDN)”. I also recommend using the “Monthly Enterprise Channel” for enterprise customers.

Because Visio and Project need separated licenses, I would recommend deploying Visio or Project separately from other M365 Apps. Here I have configured three configuration policies for Microsoft 365 Apps, Visio and Project.

Download all three configurations and save them to C:\Temp\Office as “M365Apps_Install.xml”, “Visio_Install.xml”, and “Project_Install.xml”.

Optional: Create a separate configuration file for app removal. The example below is for the removal of the Microsoft 365 Apps.

<Configuration>
	<Remove>
		<Product ID="O365ProPlusRetail" >
			<Language ID="fi-FI" />
			<Language ID="en-us" />
		</Product> 
	</Remove>	
	<Display Level="None" />
	<Logging Name="O365ProPlusRetailSetup.txt" Path="%systemdrive%\Windows\CCM\Logs\Software" />	
</Configuration>

You should now have all these files in: C:\Temp\Office :

Step 3: Repackaging using the PSAppDeployToolkit

First, download the PSAppDeployToolkit from https://psappdeploytoolkit.com/, there are lots of great posts on how to use this tool, I won’t go into details here. Let’s copy all those files that you just created, and paste them to the PSAppDeployToolkit “Files” folder.

Optional advance configuration

For each of the Microsoft 365 Apps along with Visio and Project, I created a separate Deploy-xxx.ps1 script file. When you deploy these apps from ConfigMgr, you can use the same content source, instead of three different ones. This concept also reduces the need for updating three different packages. Example Microsoft updates Office Deployment Tool every few months, you just need to update setup.exe to one single package instead of many. It might look something like the screenshot below (you will find these scripts at the end of this post)

Step 4: Deploy them from ConfigMgr

These are examples based on earlier mentioned “Optional advance configuration”.

During the creation of the Microsoft 365 Apps application package, I use the following install command line:

PowerShell.exe -ExecutionPolicy Bypass -NoLogo -NonInteractive -NoProfile -WindowStyle Hidden -File "Deploy-M365Apps.ps1" -DeploymentType Install

For Visio use this Install command line:

PowerShell.exe -ExecutionPolicy Bypass -NoLogo -NonInteractive -NoProfile -WindowStyle Hidden -File "Deploy-Visio.ps1" -DeploymentType Install

For Project use this Install command line:

PowerShell.exe -ExecutionPolicy Bypass -NoLogo -NonInteractive -NoProfile -WindowStyle Hidden -File "Deploy-Project.ps1" -DeploymentType Install

For the detection rule of Microsoft 365 Apps, I choose to use a registry value lookup.
Please modify the lookup to fit your requirements.

When you install the Microsoft 365 Apps from the Software Center, you will be able to see the Office installation data downloading from the internet via the Office 365 CDN.

Example script files

You are welcome to download my example script files that I used to create this blog article. You will find them located in my GitHub repository at:

https://github.com/sandytsang/DeployM365Apps/releases

Well, that’s it! I hope this post will help you roll out Microsoft 365 Apps to all your #WFH users. Have a beautiful day!

(2429)

The post Deploy Microsoft 365 Apps with “no content” appeared first on MSEndpointMgr.

WIM Witch v2.3.0 – ISO Creation, Upgrade Packages, Optional and Dynamic Updates, Boot.wim updating

$
0
0

This release of WIM Witch adds a feature that has been requested since the initial release of WIM Witch – creating an ISO. While creating an ISO only requires a single executable and a single command line, the underlying process required extensive coding to make the feature usable and valuable within WIM Witch. In addition, these features lay the groundwork for ConfigMgr Upgrade Package management.

Import ISO Binaries

To get started, the binaries for the ISO will need to be imported. On the Import WIM tab, simply put a check mark in the ISO/Upgrade Packaged check box, select a source ISO, and then click import. This will copy all the files in the ISO, except the WIM file which should be imported with the Import WIM function. WIM Witch will determine if the ISO is Windows 10 or Server, and which version.

The ISO import check box enabled

Download Dynamic and Optional Updates

Prior to this release, WIM Witch would only download “Required” updates. These included Servicing Stack, Latest Cumulative, Adobe, and .Net updates. This release now supports Optional and Dynamic updates. Note that in order to download these updates, these check boxes must be checked. This is applicable both to the “Download” button on the Update Catalog tab, as well as the “Check for Updates” option on the Make It So tab.

The new types of updates selected for downloading

Optional Updates

Optional Updates are not needed on every Windows system and it is up to the admin to determine if the optional update should be applied. To download, select the option in the Update Catalog tab window.

Dynamic Updates

Dynamic Updates are intended to update the setup files of the Windows installation media, and these updates are not applied to a WIM. To download these updates, select the option in the Update Catalog tab.

Apply Optional Update

To apply Optional Updates, simply check “Include Optional” under “Enable Updates”. Note that this feature will be greyed out until “Enable Updates” is selected. As these types of updates are applied to a WIM, they will be applied during the normal update function of Make It So.

The Updated “Make It So” tab

Upgrade Packages – A Work in Progress

The Upgrade Package functionality is very limited as of this release. All WIM Witch currently does is stage the files for the package into a specified folder. WIM Witch should have parity feature set for ConfigMgr Upgrade Packages as she does with ConfigMgr Operating System Images at some point soon, but that’s going to take some more work.

If one wishes to leverage the current feature, simply check the box “Upgrade Package Path” and specify the location. Once the package has been created, the admin will need to import the package into ConfigMgr. One should also be able to update an existing package because WIM Witch is set to overwrite the files in the destination path.

Create ISO

To create an ISO, the user will need to specify the source WIM that will serve as the basis for the image, the folder where the ISO is to be created, and the file name for the ISO. These parameters will become available upon clicking the check box labeled “create ISO”.

It must be noted that this feature will not work if Windows ADK -> “Deployment Tools” is not installed in a default folder. WIM Witch is dependent on a small application called OSCDIMG to create the ISO file. WIM Witch will look in the default Program Files location for this file. If OSCDIMG is not in a typical location or not installed, the feature will not work. There will likely be an option to customize this path in a future release.

Where OSCDIMG lives

WIM Witch only supports 64 bit images and UEFI when creating ISOs.

This box will appear when the ISO is being created.

ISO and Upgrade Package Options

The three new check boxes introduced into the Make It So tab are only applicable to ISO file and/or Upgrade Package creation. One of the two options will need to be checked in order to make these options available.

Apply Dynamic Update

To apply Dynamic Updates, simply check the box labeled “Apply Dynamic Updates”. This function does not happen during the normal update process as Dynamic updates are not applied to a WIM file, but to the “Sources” folder of installation media.

Applying Dynamic Updates

Update Boot WIM

The boot.wim file that is part of the upgrade package / ISO can be updated with Servicing Stack and Latest Cumulative Updates. To update this file, simply check the option to “Update Boot WIM”. This process will mount each index of the boot.wim (usually WinPE and Windows Setup indexes) and will apply both of these types of updates to the boot.wim file.

WIM Witch will perform the update to the boot.wim file after the main Windows WIM file is created.

The boot.wim update process

Do Not Create Stand Alone WIM

If one only wishes to create an ISO or an Upgrade Package only, there is an option now to not create a WIM file. In order to leverage this feature, simply enable either the ISO or Upgrade Package option, then select “Do Not Create a stand alone WIM”. It should be noted that when this option is selected, the name and path options for the WIM are greyed out. Further, the name of the WIM file is automatically changed to “install.wim” in the wim file field. This is because the wim file is still needed to create the package, but it will be discarded after Making It So.

Known Bugs

  • A log file is generated and copied to the default WIM location when the “Do Not Create Stand Alone WIM” is selected
  • New check boxes and fields have not been integrated into Save/Load or CM Image info
  • This has not been tested on Windows Server images
  • OSCDIMG is only looked for in default folder. Ensure Deployment Tools from ADK are installed in a default folder to use
  • Dynamic Updates are always deleted when checking for Superseded updates. The update will be re-downloaded.
  • None of the new functionality has been setup for command line usage.
  • Some optional updates are not in a .CAB file format. WIM Witch will generate a warning that an update was not found when applying, but does not specify why. Any optional update in a CAB file format will apply.

(816)

The post WIM Witch v2.3.0 – ISO Creation, Upgrade Packages, Optional and Dynamic Updates, Boot.wim updating appeared first on MSEndpointMgr.

When Co-Management Goes Bad: The case of Windows 10 IPU and the missing MDM certificate

$
0
0

Windows 10 in-place upgrades are something that many organisations have refined over the years, moving from build to build as to align their machines with support from Microsoft and get the latest feature set of the new OS. Over the past year the same organisations have probably started to enable co-management of devices, to leverage the Endpoint Manager portal to its full extent, or to shift workloads to Intune.

So what happens if a bug breaks your co-management state? In this post we are going to cover this scenario as some people have found themselves having to deal with this issue due to a recent bug.

Windows 10 IPU Certificate Bug

Recently, Microsoft reported issues with any build of Windows 10 from 1809 and higher, running an in place upgrade where an unfortunate bug resulted in the removal of certificates from the certificate store. Below are the full details from Microsoft on the bug as posted here –Windows 10, version 1903 and Windows Server, version 1903 | Microsoft Docs

Certificates may not be present after updating to a newer version of Windows 10

StatusOriginating updateHistory
InvestigatingOS Build 18362.1110
KB4577062
2020-09-16
Last updated: 2020-10-30, 05:56 PT
Opened: 2020-10-30, 05:16 PT

System and user certificates might be lost when updating a device from Windows 10, version 1809 or later to a later version of Windows 10. Devices will only be impacted if they have already installed any Latest cumulative update (LCU) released September 16, 2020 or later and then proceed to update to a later version of Windows 10 from media or an installation source which does not have an LCU released October 13, 2020 or later integrated. This primarily happens when managed devices are updated using outdated bundles or media through an update management tool such as Windows Server Update Services (WSUS) or Microsoft Endpoint Configuration Manager. 

This might also happen when using outdated physical media or ISO images that do not have the latest updates integrated.  

Note Devices using Windows Update for Business or that connect directly to Windows Update are not impacted. Any device connecting to Windows Update should always receive the latest versions of the feature update, including the latest LCU, without any extra steps.  

In-Place Upgrade.. No Problem.. All Appears Well.. Oh Wait..

In the case of co-management, having your certificates scrubbed is a REALLY bad thing due to the fact that machines require an MDM device certificate to communicate with Intune. This process happens during the on-boarding / enrollment process automatically, an example of what you should see from a certificate perspective is below;

So lets paint a picture where you upgrade several thousand devices, after the October updates were applied and just before you serviced the WIM, only to then discover this;

In this case I was first made aware of this issue by a customer, whereby the network team reported a flood of traffic hitting their firewalls going to IP addresses 13.82.96.212 and 104.40.82.191, causing their firewall CPU’s to max out at 100% utilization and in general give everyone a really really bad day getting in our out of their network.

The network team had traced these IP addresses to be part of Microsoft Endpoint Manager IP address range, as listed here – Network endpoints for Microsoft Intune | Microsoft Docs, and had no choice but to block communications to the IP’s in order to save their network.

Looking at the Intune Management Extension logs we can clearly see the issue;

Mass In-Place Upgrade Issues

So if you have had the unfortunate event where you too have upgraded and have this issue, what are your options?

  • Microsoft’s Recommendation

    Workaround: If you have already encountered this issue on your device, you can mitigate it within the uninstall window by going back to your previous version of Windows using the instructions here. The uninstall window might be 10 or 30 days depending on the configuration of your environment and the version you’re updating to. You will then need to update to the later version of Windows 10 after the issue is resolved in your environment. 

    Note Within the uninstall window, you can increase the number of days you have to go back to your previous version of Windows 10 by using the DISM command /Set-OSUninstallWindow. You must make this change before the default uninstall window has lapsed. For more information, see DISM operating system uninstall command-line options
  • MS Support Recommendation

    Workaround: Search in the Windows Old folder the Certificates on system context (not user) – C:\Windows\System32\config\systemprofile\AppData\Roaming\Microsoft\SystemCertificates – (here you may have multiple other folders). Manual move the folders with the certificates to the new Windows folder under the exact same location as listed on the Old Windows folder.. Restart the device – Make sure it has DC connectivity and Internet connectivity

But what happens if you have passed the roll back window, cant roll back due to operational reasons, or cant find the certs in the Windows.old?..

There Is Another Way

Fortunately there is a way to force the re-enrollment process, having initially seen a method on another blog (https://www.maximerastello.com/) which appears to have since gone offline.

I manually tested the process of doing the following;

Step 1: Delete The Device
• Delete the device from the Endpoint Manager Portal

Step 2: Delete Scheduled Task
Follow this procedure:
• Run the Task Scheduler as an administrator.
• Go to Task Scheduler Library > Microsoft > Windows > EnterpriseMgmt. Write down the enrollment ID somewhere, you will need it for the cleanup.
• Delete all the existing tasks the enrollment folder.
• Delete the enrollment ID folder.

Step 3: Registry Key Deletion
Use the previous enrollment ID to search the registry:
• Open the Registry Editor as an administrator.

Search for the enrollment ID you wrote in the following locations and if found, delete the key that is containing the ID:
HKEY_LOCAL_MACHINE\SOFTWARE\Microsoft\Enrollments\xxxxxxxxxxxxx
HKEY_LOCAL_MACHINE\SOFTWARE\Microsoft\Enrollments\Status\xxxxxxxxxxxxx
HKEY_LOCAL_MACHINE\SOFTWARE\Microsoft\EnterpriseResourceManager\Tracked\xxxxxxxxxxxxx
HKEY_LOCAL_MACHINE\SOFTWARE\Microsoft\PolicyManager\AdmxInstalled\xxxxxxxxxxxxx
HKEY_LOCAL_MACHINE\SOFTWARE\Microsoft\PolicyManager\Providers\xxxxxxxxxxxxx
HKEY_LOCAL_MACHINE\SOFTWARE\Microsoft\Provisioning\OMADM\Accounts\xxxxxxxxxxxxx
HKEY_LOCAL_MACHINE\SOFTWARE\Microsoft\Provisioning\OMADM\Logger\xxxxxxxxxxxxx
HKEY_LOCAL_MACHINE\SOFTWARE\Microsoft\Provisioning\OMADM\Sessions\xxxxxxxxxxxxx
DO NOT delete registry keys that are not in the list above. They will be overwritten after the new enrollment.

Step 4: Force Reenrollment
To be properly executed, the enrollment command must be entered in a SYSTEM context.

• Use PSExec to launch a Command Prompt as SYSTEM: psexec /i /s cmd
• In the Command Prompt, enter the following command: c:\windows\system32\deviceenroller.exe /c /AutoEnrollMDM

In this case, the process worked, but be patient for the device to update in the portal;

PowerShell Automation

Taking the manual process and constructing it into PowerShell allows you to deploy a script to the affected devices. So here it is, a script that you can deploy either via a CB, first of all checking for machines without an Intune MDM cert, or as a script to push out to your devices.

Note: You will need to bulk delete your affected devices in Intune first, which can be performed via Bulk Actions after filtering the machine list based on the last check in date, or obtaining a device list by using a CI to check devices for the MDM certificate presence.

Note that deleting your devices from Endpoint Manager and running this script is provided without warranty, do so at your own risk.

<#	
	.NOTES
	===========================================================================
	 Created on:   	06/11/2020 14:23
	 Created by:   	MauriceDaly
	 Filename:     	Invoke-MDMReenrollment.ps1
	===========================================================================
	.DESCRIPTION
		Force re-enrollment of Intune managed devices due to Intune MDM certificate
		issues during IPU
#>

#region Functions

# Logging Function
function Write-LogEntry {
	param (
		[parameter(Mandatory = $true, HelpMessage = "Value added to the log file.")]
		[ValidateNotNullOrEmpty()]
		[string]$Value,
		[parameter(Mandatory = $true, HelpMessage = "Severity for the log entry. 1 for Informational, 2 for Warning and 3 for Error.")]
		[ValidateNotNullOrEmpty()]
		[ValidateSet("1", "2", "3")]
		[string]$Severity,
		[parameter(Mandatory = $false, HelpMessage = "Name of the log file that the entry will written to.")]
		[ValidateNotNullOrEmpty()]
		[string]$FileName = "Invoke-MDMReenrollment.log"
	)
	# Determine log file location
	$global:LogFilePath = Join-Path -Path $Env:windir -ChildPath "CCM\Logs\$FileName"
	
	# Construct time stamp for log entry
	$Time = -join @((Get-Date -Format "HH:mm:ss.fff"), " ", (Get-WmiObject -Class Win32_TimeZone | Select-Object -ExpandProperty Bias))
	
	# Construct date for log entry
	$Date = (Get-Date -Format "MM-dd-yyyy")
	
	# Construct context for log entry
	$Context = $([System.Security.Principal.WindowsIdentity]::GetCurrent().Name)
	
	# Construct final log entry
	$LogText = "<![LOG[$($Value)]LOG]!><time=""$($Time)"" date=""$($Date)"" component=""Invoke-MDMReenrollment"" context=""$($Context)"" type=""$($Severity)"" thread=""$($PID)"" file="""">"
	
	# Add value to log file
	try {
		Out-File -InputObject $LogText -Append -NoClobber -Encoding Default -FilePath $global:LogFilePath -ErrorAction Stop
	} catch [System.Exception] {
		Write-Warning -Message "Unable to append log entry to Invoke-MDMReenrollment.log file. Error message: $($_.Exception.Message)"
	}
}
#endregion Functions

#region Variables

$RegistryKeys = "HKLM:\SOFTWARE\Microsoft\Enrollments", "HKLM:\SOFTWARE\Microsoft\Enrollments\Status","HKLM:\SOFTWARE\Microsoft\EnterpriseResourceManager\Tracked", "HKLM:\SOFTWARE\Microsoft\PolicyManager\AdmxInstalled", "HKLM:\SOFTWARE\Microsoft\PolicyManager\Providers","HKLM:\SOFTWARE\Microsoft\Provisioning\OMADM\Accounts", "HKLM:\SOFTWARE\Microsoft\Provisioning\OMADM\Logger", "HKLM:\SOFTWARE\Microsoft\Provisioning\OMADM\Sessions"

#endregion Variables

try {
	Write-LogEntry -Value "[MDM Enrollment Issue Detection Script] Checking for MDM certificate in computer certificate store" -Severity 1
	
	# Check for MDM device certificate
	$IntuneMDMCert = Get-ChildItem -Path Cert:\LocalMachine\My | Where-Object {
		$_.Issuer -match "Intune MDM"
	}
	
	if ($IntuneMDMCert.Count -eq 0) {
		Write-LogEntry -Value "[MDM Issue Detected] Intune MDM certificate does not exist. Starting forced on-boarding process." -Severity 1
		
		# Obtain current management GUID from Task Scheduler
		$EnrollmentGUID = Get-ScheduledTask | Where-Object {$_.TaskPath -like "*Microsoft*Windows*EnterpriseMgmt*"} | Select-Object -ExpandProperty TaskPath -Unique | Where-Object {$_ -like "*-*-*"} | Split-Path -Leaf

		# Start clean up process
		if (-not [string]::IsNullOrEmpty($EnrollmentGUID)) {
			Write-LogEntry -Value "- Current enrollment GUID detected as $([string]$EnrollmentGUID)" -Severity 1
			
			# Stop Intune Management Exention Agent and CCM Agent services
			Write-LogEntry -Value "- Stopping MDM services" -Severity 1
			if (Get-Service -Name IntuneManagementExtension) {
				Write-LogEntry -Value "- Stopping IntuneManagementExtension service..." -Severity 1
				Stop-Service -Name IntuneManagementExtension
			}
			Write-LogEntry -Value "- Stopping CCMExec service..." -Severity 1
			Stop-Service -Name CCMExec
			
			# Remove task scheduler entries
			Write-LogEntry -Value "- Removing task scheduler Enterprise Management entries for GUID - $([string]$EnrollmentGUID)" -Severity 1
			Get-ScheduledTask | Where-Object {$_.Taskpath -match $EnrollmentGUID} | Unregister-ScheduledTask -Confirm:$false
			
			foreach ($Key in $RegistryKeys) {
				Write-LogEntry -Value "- Processing registry key $Key" -Severity 1
				# Remove registry entries
				if (Test-Path -Path $Key) {
					# Search for and remove keys with matching GUID
					Write-LogEntry -Value "- GUID entry found against key $Key. Removing.." -Severity 1
					Get-ChildItem -Path $Key | Where-Object {$_.Name -match $EnrollmentGUID} | Remove-Item -Recurse -Force -Confirm:$false -ErrorAction SilentlyContinue
				}
			}
			
			# Start Intune Management Exention Agent service
			Write-LogEntry -Value "- Starting MDM services" -Severity 1
			if (Get-Service -Name IntuneManagementExtension) {
				Write-LogEntry -Value "- Starting IntuneManagementExtension service..." -Severity 1
				Start-Service -Name IntuneManagementExtension
			}
			Write-LogEntry -Value "- Starting CCMExec service..." -Severity 1
			Start-Service -Name CCMExec
			
			# Sleep
			Write-LogEntry -Value "- Waiting for 30 seconds prior to running DeviceEnroller" -Severity 1
			Start-Sleep -Seconds 30
			
			# Start re-enrollment process
			Write-LogEntry -Value "- Calling C:\Windows\System32\DeviceEnroller.exe with /C /AutoenrollMDM switches" -Severity 1
			$EnrollmentProcess = Start-Process -FilePath "C:\Windows\System32\DeviceEnroller.exe" -ArgumentList "/C /AutoenrollMDM" -NoNewWindow -Wait -PassThru
			
		} else {
			Write-LogEntry -Value "Unable to obtain enrollment GUID value from task scheduler. Aborting" -Severity 3; exit 1
		}
	} else {
		Write-LogEntry -value "Device machine certifice exists. Aborting" -Severity 2; exit 1
	}
	
} catch [System.Exception] {
	Write-LogEntry -value "Error message: $($_.Exception.Message)" -Severity 3; exit 1
}

The Results

Always test on a small subset of devices first, but the results should be something like below;

Devices have re-appeared, are co-managed once again and the check in date should be up to date.

Conclusion

This method allows for automated re-onboarding of devices which are in a co-managed state and have been impacted by this IPU bug. Hotfixes are in the process of being released by Microsoft, and of course, make sure you are always using the latest ISO’s and serviced WIM’s before deployment.

Thanks for reading

(1434)

The post When Co-Management Goes Bad: The case of Windows 10 IPU and the missing MDM certificate appeared first on MSEndpointMgr.

Repair a broken trust relationship between a workstation and the domain

$
0
0

I was attending the SCUG Sweden meeting at Microsoft offices in Stockholm on the 8-9 of October. During the second day, one of the session was a copy of the Community Session from MMS 2018. This session is the attendee’s way to show each other’s tools they use in their daily work.

One of my demos was a script that repairs a trust relationship between a workstation and the primary domain.

This is based on the command Test-ComputerSecureChannel.

First up I created a Configuration Item that check if the relation is broken. The Discovery script is simple

On the compliance rule check for value True.

So now we can check if the computer has a broken trust to the domain. You can either have a remediation script or a ConfigMgr script to fix the issue.

The script looks like this:

if (!(Test-ComputerSecureChannel)) {
$Secret = 'UABAAHMAcwB3AG8AcgBkAA=='
$DecodedText = [System.Text.Encoding]::Unicode.GetString([System.Convert]::FromBase64String($Secret))
$Username = 'RADECK-DEMO\COMPUTER_PWDRESET'
$password = convertto-securestring -String $DecodedText -AsPlainText -Force
$ADRepairCred = new-object -typename System.Management.Automation.PSCredential -argumentlist $username, $password
Test-ComputerSecureChannel -Repair -Credential $ADRepairCred
}

I know it’s not a secure way to store the password in the script, but it feels better than writing it in plain text.

To create the $Secret use this code:

$Text = 'P@ssword'
$Secret = [Convert]::ToBase64String([System.Text.Encoding]::Unicode.GetBytes($Text))
$Secret

It’s very important to only give account the rights it needs. To delegate the rights in Active Directory run this command after changing the OU and User:

dsacls.exe "OU=Radeck Computers,OU=Radeck,DC=demo,DC=radeck,DC=se" /G RADECK-DEMO\COMPUTER_PWDRESET":CA;Reset Password;Computer" /I:S

You should end up with something like this:

To up the security some more you can create a GPO that doesn’t allow that user to logon locally

I made a movie where I repair the trust with ConfigMgr Script:

You can find the script on my github:
Radeck-Public/ConfigMgr-Stuff at master · JRadeck/Radeck-Public · GitHub

And here you can download the CI:
https://1drv.ms/u/s!AhuAzOv7Sur5g_ASI0m_uf5-W8wt2w

So if you want to test this, just reset the computer account in the Active Directory

I want to end this blog by thanking the team behind msendpointmgr.com for the possibility to blog on this fine blog.

(473)

The post Repair a broken trust relationship between a workstation and the domain appeared first on MSEndpointMgr.

Automatically Migrate Applications from ConfigMgr to Intune with the Win32App Migration Tool

$
0
0
Win32App Migration Tool

The Win32App Migration Tool is a free community tool that has been developed to do the scoping and heavy lifting for you as you consider building Win32apps in Intune while using your ConfigMgr apps as a reference. The tool is designed to inventory ConfigMgr Applications and Deployment Types, build .intunewin files and create Win32apps directly in the MEM admin center.

Table of Contents

Background

Microsoft Endpoint Manager (MEM) continues to grow from strength to strength. Having just recently marked its 10 year anniversary, Intune, part of MEM, is now a real force to be reckoned with. Many companies are realising the value of modernising the way they manage their endpoints and MEM offers them an astonishing arsenal of options. Every company I work with has a slightly different approach to modern management and the line between “on-premise” and “cloud” has definitely been blurred with recent MEM developments.

Many endpoint administrators and solution experts have invested heavily in the Configuration Manager application model. It has been a robust solution to deploy applications to devices since before I can even remember so here comes the challenge…as I look to move more workloads to the cloud to support my internet based devices, can I take my applications, that I invested blood, sweat and tears over for all those years, with me? Sure. Many organisations are realising the value of Cloud Management Gateway (CMG). I can absolutely deploy a CMG and continue to deliver my ConfigMgr apps to my internet based devices without killing my VPN. But what if part of my modern management strategy is to move my applications into Intune too? Or what if I want to start testing my business application delivery from Intune? Dipping a toe in the proverbial water so to speak. Can I not just export my applications from ConfigMgr straight into Intune? Sadly, no.

Deploying Win32apps, from Intune, very closely resembles the application delivery method in ConfigMgr. Win32apps have install/uninstall commands, requirements, detection logic, dependencies and now even supersedence (preview feature). One main difference is that you have to use a tool to “package” the application for delivery. A high level overview of creating a Win32app, when referencing a ConfigMgr app, to deploy from Intune, is:-

  1. Locate the source content directory for the ConfigMgr Application “Deployment Type”
  2. Identify the “Setup File” for each Deployment Type e.g. “AdobeReader.msi” or “InstallMyApp.ps1”
  3. Use the Win32 Content Prep Tool to take that information to create a .intunewin file
  4. Create a Win32app in the MEM console, upload the .intunewin and specify the app details, a logo, install/uninstall commands, program behaviour, return codes, detection logic, requirements, dependencies and supersedence rules (preview). This information would have to be gathered, normally manually, from the ConfigMgr console

Maurice Daly has a good blog post on how to deploy Win32apps – go and check it out to learn more
https://msendpointmgr.com/2018/09/24/deploy-win32-applications-with-microsoft-intune/

Win32App Migration Tool

The Win32App Migration Tool is a free community tool that has been developed to do the scoping and heavy lifting for you as you consider building Win32apps in Intune while using your ConfigMgr apps as a reference. The tool is designed to inventory ConfigMgr Applications and Deployment Types, build .intunewin files and create Win32apps directly in the MEM admin center. Instead of manually checking Application and Deployment Type information and gathering content to build Win32apps, the Win32App Migration Tool is designed to do that for you.

Planned Development

The Win32App Migration Tool is still in development. This is a FREE community tool and will have input from various community members through each development stage. At the time of writing this post the tool is still in BETA with the intention to move rapidly to RELEASE and then General Availability (GA). You can expect the following features at each release cycle: –

This image has an empty alt attribute; its file name is image-23-1024x722.png
Win32 App Migration Tool Development Release Cycle

Requirements

  • Configuration Manager Console The ConfigMgr console must be installed on the machine you are running the Win32App Migration Tool from. The following path should resolve true: $ENV:SMS_ADMIN_UI_PATH
  • Local Administrator The default Working folder is %SystemDrive%\Win32AppMigrationTool. You will need permissions to create this directory on the System Drive
  • Roles Permission to run the Configuration Manager cmdlet Get-CMApplication
  • Content Folder Permission Read permissions to the content source for the Deployment Types that will be exported
  • PowerShell 5.1
  • .NET Framework 4.7.2 to run the Win32 Content Prep Tool
  • NuGet Provider 2.8.5.201 or newer
  • Internet Access to download the Win32 Content Prep Tool

Configuration Manager cmdlets must be run from the Configuration Manager site drive. The Win32App Migration Tool will automatically attempt to make this connection

Installation

The Win32App Migration Tool is published in the PowerShell Gallery. You can install the module by running the command: –

Install-Module -Name Win32AppMigrationTool
https://www.powershellgallery.com/packages/Win32AppMigrationTool

Working Directory

The Win32App Migration Tool will build (and maintain) the following “Working Directory”. The default directory created is %SystemDrive%\Win32AppMigrationTool

Win32App Migration Tool Folder Structure

Content

The Deployment Type content for the selected Application(s) will be copied to this folder. A folder will be created for each identified Deployment Type

Win32App Migration Tool Content Folder

ContentPrepTool

The Win32 Content Prep Tool IntuneWinAppUtil.exe will be downloaded to this folder

Win32App Migration Tool ContentPrepTool Folder

Details

During the BETA and RELEASE phase you will use the information gathered from ConfigMgr to build out the Win32apps in Intune manually. The information you will need is exported to 2 of the 3 CSV’s in the Details folder. Applications.csv and DeploymentTypes.csv

Win32App Migration Tool Details Folder

The information gathered in each CSV is as follows:-

Applications

Information about the Application(s) selected using the Win32App Migration Tool. This information can be used to build out the Win32app in Intune. Application_LogicalName is a link reference to Application_LogicalName in DeploymentType.csv

  • Application_LogicalName
  • Application_Name
  • Application_Description
  • Application_Publisher
  • Application_Version
  • Application_IconId
  • Application_TotalDeploymentTypes
Content

You can track where the content is downloaded for each Deployment Type. Content_DeploymentType_LogicalName is a link reference to DeploymentType_LogicalName in DeploymentTypes.csv

  • Content_DeploymentType_LogicalName
  • Content_Location
DeploymentTypes

Information specific to each deployment type for each Application(s) selected using the Win32App Migration Tool. This information can be used to build out the Win32app in Intune

  • Application_LogicalName
  • DeploymentType_LogicalName
  • DeploymentType_Name
  • DeploymentType_Technology
  • DeploymentType_ExecutionContext
  • DeploymentType_InstallContent
  • DeploymentType_InstallCommandLine
  • DeploymentType_UnInstallSetting
  • DeploymentType_UninstallContent
  • DeploymentType_UninstallCommandLine

Logos

Application Logos are exported to this folder

Win32App Migration Tool Logos Folder

Logs

Detailed log information can be found in Main.log

Win32App Migration Tool Logs Folder – Main.log

Win32Apps

.intunewin files are exported to Win32Apps\Application_<GUID>\DeploymentType_<GUID>\<setupfile>.intunewin

Win32App Migration Tool Win32Apps Folder

Using the Win32 App Migration Tool

Once you have installed the module and observed the prerequisites you are ready to begin using the tool. During the BETA phase you will pass parameters to the Win32App Migration Tool in PowerShell. The command we run is New-Win32App. The following parameters are valid:-

Parameters

.Parameter AppName (Required)
Pass an app name to search for any matching applications in ConfigMgr. You can use * as a wildcard e.g. “Microsoft*” or “*Reader”

.Parameter SiteCode (Required)
Specify the Sitecode you wish to connect to

.Parameter ProviderMachineName (Required)
Specify the Site Server to connect to

.Parameter ExportLogo 
When passed, the Application logo is decoded from base64 and exported to the Logos folder

.Parameter WorkingFolder This is the working folder for the Win32AppMigration Tool. Care should be given when specifying the working folder because downloaded content can increase the working folder size considerably. The following folders are created in this directory:-

-Content
-ContentPrepTool
-Details
-Logos
-Logs
-Win32Apps

.Parameter PackageApps
Pass this parameter to package selected apps in the .intunewin format. The .Intunewin files will be saved in the %WorkingFolder%\Win32Apps folder

.Parameter CreateApps (Not available in BETA or RELEASE development phases)
Pass this parameter to create the Win32apps in Intune

.Parameter ResetLog
Pass this parameter to reset the log file

.Parameter NoOGV
Pass this parameter supress the Out-GridView for selecting Applications. You can still pass wildcards to the -AppName parameter

Examples

Basic Example

Using the required parameters, we can run the tool for the first time

New-Win32App -AppName "Microsoft*" -ProviderMachineName bb-cm1.byteben.com -SiteCode BB1
The Win32App Migration Tool will connect to the specified site drive and setup the environment

Without specifying any other parameters, we are presented a Grid View, in a separate PowerShell window, with any apps that matched the AppName parameter that we passed. You can multi-select Applications using the Ctrl or Shift key. Press OK to pass the selected Application(s)

Select an Application from the Grid View windows

The tool will gather the Application and Deployment Type information and export it to “%WorkingFolder%\Details” Applications.csv and DeploymentTypes.csv

Snippet example of DeploymentTypes.csv export
Exporting Logos

Run the basic example command and add the ExportLogo parameter

New-Win32App -AppName "Microsoft*" -ProviderMachineName bb-cm1.byteben.com -SiteCode BB1 -ExportLogo
Passing the ExportLogo parameter will export the Application logo to %WorkingFolder%\Logos\<IconId>\logo.jpg
Reset the Log

Run the basic example command and add the ResetLog parameter

New-Win32App -AppName "Microsoft*" -ProviderMachineName bb-cm1.byteben.com -SiteCode BB1 -ResetLog
Passing the ResetLog parameter will clear %WorkingFolder%\Logs\Main.log
Omit the Grid View

Run the basic example command and add the NoOGV parameter to omit the Grid View. The script will accept the AppName parameter and search for any Applications that match. You will not be prompted to choose from a list of available matches. Use CAUTION when using this parameter and at the same time using a wildcard in the AppName parameter as an unexpected large number of Applications may be returned and processed by the tool

New-Win32App -AppName "Microsoft*" -ProviderMachineName bb-cm1.byteben.com -SiteCode BB1 -NoOGV
Large numbers of results may be retuned if you use a wildcard in the AppName parameter and choose to omit the Grid View
Package Applications

Run the basic example command and add the PackageApps parameter. The Win32 Content Prep Tool will be downloaded to %WorkingFolder%\ContentPrepTool and the Deployment Type information gathered will be used to pass the required parameters to the Win32 Content Prep Tool. A resultant .intunewin file will be generated and exported to the %WorkingFolder%\Win32Apps\Application_<GUID>\DeploymentType_<GUID>\<Installer>.intunewin

New-Win32App -AppName "Microsoft*" -ProviderMachineName bb-cm1.byteben.com -SiteCode BB1 -PackageApps
Folders will be created for the Application(s) and Deployment Type(s) found
Content will be downloaded from the content source to %WorkingFolder%\Content\DeploymentType_<GUID>
The Win32 Content Prep Tool will create a .intunewin file for each Deployment Type in
%WorkingFolder%\Win32Apps\Application_<GUID>\DeploymentType_<GUID>\<Installer>.intunewin

Versioning

Versioning information and on-going development details can be found on the following GitHub page:-

https://github.com/byteben/Win32App-Migration-Tool

Win32 App Migration Tool GitHub Repo

Summary

At the time of writing this post the Win32App Migration Tool is still in BETA. I am thrilled by the community buzz and interest so far. I cannot wait to see the feedback during the Release and General Availability phases as the tool is developed in collaboration with the MEM community. I am particularly excited about the upcoming Console Extension in ConfigMgr!

If you have any feedback or ideas my DM’s are open on Twitter @byteben or you can collaborate/report issues on the GitHub page https://github.com/byteben/Win32App-Migration-Tool

(1768)

The post Automatically Migrate Applications from ConfigMgr to Intune with the Win32App Migration Tool appeared first on MSEndpointMgr.

Running custom actions during a Windows 10 Feature Update with Configuration Manager

$
0
0

Deploying Windows 10 Feature Updates in your organisation can be approached in multiple ways. As we merge the perimeter with the Cloud some of us are trying to understand the best way to deliver Feature Updates to our devices. Should we deploy an in-place upgrade using a ConfigMgr task sequence? Perhaps we should push the Feature Update directly from ConfigMgr to our devices. Have we considered leveraging our CMG and using Microsoft as a source for the update binaries to save our VPNs? Maybe some of us are on a co-management journey and are looking at using WUfB. Which ever technology we are leveraging one of the questions that normally gets asked is “Can we control the update process in a way that lets us ‘Run Stuff’ after the Feature Update has completed”.

SetupConfig.ini

When a Feature Update is deployed using the Windows Update Service a file called SetupConfig.ini can be used to control some aspects of the update process. The SetupConfig.ini file can be used by admins in scenarios where there is the inability to pass specific switch parameters to setup.exe during a Windows 10 Feature Update.

Below is an example of the what the content of SetupConfig.ini might look like

[SetupConfig]
NoReboot
ShowOobe=None
Telemetry=Enable
InstallDrivers=
ReflectDrivers=

The example above is taken from
https://docs.microsoft.com/en-us/windows-hardware/manufacture/desktop/windows-setup-automation-overview

For a more comprehensive list of the commands that can be used during Windows Setup check out the following Microsoft article
https://docs.microsoft.com/en-us/windows-hardware/manufacture/desktop/windows-setup-command-line-options

The Feature Update process will look for SetupConfig.ini in the following location: –

SystemDrive\Users\Default\AppData\Local\Microsoft\Windows\WSUS\SetupConfig.ini

PostOOBE

We can specify the POSTOOBE parameter in the SetupConfig.ini file to tell the Windows Update Service to run a command after the Feature Update has been installed. If you have previously used a ConfigMgr Task Sequence to manage in-place upgrades, you may have noticed that ConfigMgr would typically reference a batch file called SetupComplete.cmd to run after the update process. It makes sense to use the same batch file name for familiarity when we use the Windows Update Service to deploy a Feature Update. The batch file can be placed anywhere on the device as long as it isn’t removed during the Feature Update process. For this reason, placing it outside of the Windows directory is quite sensible.

Below is an example of what the POSTOOBE reference might look like in the SetupConfig.ini

[SetupConfig]
NoReboot
ShowOobe=None
Telemetry=Enable
InstallDrivers=
ReflectDrivers=
POSTOOBE=C:\ProgramData\FeatureUpdate\SetupComplete.cmd

A Batch File…Really?

SetupComplete.cmd is simply used to kick off any script or process we want to run after the Feature Update has been installed. You can specify multiple commands within the batch file or call your other custom scripts. An example of what SetupComplete.cmd may contain could be: –

PowerShell.exe -ExecutionPolicy Bypass -File C:\ProgramData\FeatureUpdate\SetupComplete.ps1 -WindowStyle Hidden

Practical Example

Feature Update – Post OOBE Script

Because we are using the Windows Update Service to deliver the Feature Update (not a Task Sequence), I would typically deploy my custom POSTOOBE scripts and files as an application in ConfigMgr or Win32app in Intune. In the example that follows I will show you how to leverage SetupConfig.ini to run a PowerShell script during POSTOOBE and copy some files back into the Windows directory that may have been overwritten during the Feature Update.

Ensure the application is deployed to the client before the client is targeted for a Feature Update

The example application we will create is called Feature Update – Post OOBE Script – 1.09.04. We will deploy the application with ConfigMgr. The application uses version control and installs files used for POSTOOBE to C:\ProgramData\FeatureUpdate\<version>. The reference to the POSTOOBE command in the SetupConfig.ini will change to reflect the version of the application we deploy from ConfigMgr e.g.

[SetupConfig]
POSTOOBE=C:\ProgramData\FeatureUpdate\1.09.04\SetupComplete.cmd

Application Intent

Our application will do the following: –

  1. Create/Replace SetupConfig.ini at SystemDrive\Users\Default\AppData\Local\Microsoft\Windows\WSUS\SetupConfig.ini
  2. Create a folder structure at: – SystemDrive\ProgramData\FeatureUpdate\<version>
  3. Create SetupComplete.cmd and add a reference to run SetupComplete.ps1. Both of these files will be saved in: – SystemDrive\ProgramData\FeatureUpdate\<version>
  4. Add a reference in SetupConfig.ini for POSTOOBE to run SystemDrive\ProgramData\FeatureUpdate\<version>\SetupComplete.cmd
  5. Version.txt should contain the version number of the application being deployed. This is useful if you change the application intent and need to ensure your devices have the up-to-date files/scripts in place before they attempt a Feature Update. The version number in this file is used to dynamically build the different elements of the solution, including the actual path where the solution will be installed. In our example, Version.txt will contain one line of text: 1.09.04
  6. Add a reference in SetupConfig.ini to set the Priority of Windows Setup to “Normal”. Some parts of a Feature Update are set to run with a low priority. Microsoft have published best practice for Feature Update priority here: – https://docs.microsoft.com/en-us/windows/deployment/update/feature-update-user-install)
  7. Copy the Files folder to SystemDrive\ProgramData\FeatureUpdate\<version>. This folder contains the files we want to copy back to the SystemDrive during POSTOOBE. The Files folder structure, in your application content source, should resemble the existing Windows disk layout. In this example, we are copying back some Default User Account Pictures to C:\ProgramData\Microsoft\User Account Pictures and a new wallpaper to C:\Windows\Web\Wallpaper
“Files” folder structure
User Account Pictures Files
Wallpaper Files

Application Installation Flow

Below is an overview of the installation flow for the Feature Update – Post OOBE Script application we will deploy from ConfigMgr

Application Scripts

We will use 3 scripts to install / maintain our “Feature Update – Post OOBE Script” application

  1. Install_SetupComplete.ps1
  2. Uninstall_SetupComplete.ps1
  3. Detect_SetupComplete.ps1

Install_SetupComplete.ps1

<#
.Synopsis
Created on:   10/04/2021
Created by:   Ben Whitmore
Filename:     Install_SetupComplete.ps1

.Description
Script to install a custom SetupComplete.cmd which will be used POSTOOBE when installing a Feautre Update using Windows Update.
Files in the "Files" source folder should resemble the structure from the root $env:SystemDrive

e.g. If you want to copy custom account pictures to your device after the OOBE they should be placed in ..\Files\ProgramData\Microsoft\User Account Pictures

Version.txt should contain the current version of SetupComplete.cmd. The application is designed with version control in mind. The version value will determine the path in $env:SystemDrive\ProgramData which the "FeatureUpdate" folder is created and the reference in SetupConfig.ini will also point to $env:SystemDrive\ProgramData\FeatureUpdate\<version>\SetupComplete.cmd
#>

#Setup environment
$ScriptPath = Split-Path -Parent $MyInvocation.MyCommand.Definition
$SetupCompleteVersionFile = Join-Path -Path $ScriptPath -ChildPath "Version.txt"

#Get intended Version of SetupComplete
Try {
    If (Test-Path -Path $SetupCompleteVersionFile) {
        $SetupCompleteVersion = Get-Content $SetupCompleteVersionFile
        $SetupCompleteLocation = Join-Path -Path "$($env:SystemDrive)\ProgramData\FeatureUpdate" -ChildPath $SetupCompleteVersion
        $SetupCompleteCMD = Join-Path -Path $SetupCompleteLocation -ChildPath "SetupComplete.cmd"
    }
}
Catch {
    Write-Host "Error getting SetupComplete Version from Script Source Directory. Does version.txt exist?"
}
  
Try {

    #Setup Directory and create SetupComplete.cmd
    New-Item $SetupCompleteLocation -ItemType Directory -Force 
    New-Item $SetupCompleteCMD -ItemType File -Force 

    #Add correct version of SetupComplete.ps1 to run post Feature Update
    Add-Content -Path $SetupCompleteCMD -Value "powershell.exe -executionpolicy bypass -file $($SetupCompleteLocation)\SetupComplete.ps1 -WindowStyle Hidden"
}
Catch {
    Write-Host "Error creating file ""$($SetupCompleteCMD)"""
}

Try {

    #Declare items to copy to Feature Update staging folder
    $SetupFiles = @("SetupComplete.ps1", "Files", "Version.txt")

    #Copy Files from Script Root to Feature Update staging folder
    Foreach ($File in $SetupFiles) {
        $FiletoCopy = Join-Path -Path $ScriptPath -ChildPath $File -ErrorAction SilentlyContinue
        Try {
            Copy-Item -Path $FiletoCopy -Destination $SetupCompleteLocation -Force -Recurse
        }
        Catch {
            Write-Warning: "Error copying item ""$($File)"" to ""$($SetupCompleteLocation)"""
        } 
    }
}
Catch {
    Write-Warning "Error setting up the Feature Update staging folder"
}

#Create SetupConfig.ini
#Source https://docs.microsoft.com/en-us/windows/deployment/update/feature-update-user-install#step-2-override-the-default-windows-setup-priority-windows-10-version-1709-and-later

#Variables for SetupConfig
$iniFilePath = "$env:SystemDrive\Users\Default\AppData\Local\Microsoft\Windows\WSUS\SetupConfig.ini"
$PriorityValue = "Normal"

$iniSetupConfigSlogan = "[SetupConfig]"
$iniSetupConfigKeyValuePair = @{"Priority" = $PriorityValue; "PostOOBE" = $SetupCompleteCMD }

#Init SetupConfig content
$iniSetupConfigContent = @"
$iniSetupConfigSlogan
"@

Try {

    #Setup SetupConfig Directory
    #Build SetupConfig content with settings
    foreach ($k in $iniSetupConfigKeyValuePair.Keys) {
        $val = $iniSetupConfigKeyValuePair[$k]
        $iniSetupConfigContent = $iniSetupConfigContent.Insert($iniSetupConfigContent.Length, "`r`n$k=$val")
    }

    #Write content to file 
    New-Item $iniFilePath -ItemType File -Value $iniSetupConfigContent -Force
}
Catch {
    Write-Warning "Error creating ""$($iniFilePath)"""
}

Uninstall_SetupComplete.ps1

<#
.Synopsis
Created on:   10/04/2021
Created by:   Ben Whitmore
Filename:     Uninstall_SetupComplete.ps1

.Description
Script to uninstall a custom SetupComplete.cmd which will be used POSTOOBE when installing a Feautre Update using Windows Update.

$env:SystemDrive\ProgramData\FeatureUpdate\<version>\ will be removed
$env:SystemDrive\Users\Default\AppData\Local\Microsoft\Windows\WSUS\SetupConfig.ini will be removed if the following line is present in SetupConfig.ini "PostOOBE=$env:SystemDrive\ProgramData\FeatureUpdate\<version>\SetupComplete.cmd"
#>

#Setup environment
$ScriptPath = Split-Path -Parent $MyInvocation.MyCommand.Definition
$SetupCompleteVersionFile = Join-Path -Path $ScriptPath -ChildPath "Version.txt"

#Get intended Version of SetupComplete
Try {
    If (Test-Path -Path $SetupCompleteVersionFile) {
        $SetupCompleteVersion = Get-Content $SetupCompleteVersionFile
        $SetupCompleteLocation = Join-Path -Path "$($env:SystemDrive)\ProgramData\FeatureUpdate" -ChildPath $SetupCompleteVersion
    }
}
Catch {
    Write-Host "Error getting SetupComplete Version from Script Source Directory. Does version.txt exist?"
}
  
Try {

    #Remove Directory
    Remove-Item $SetupCompleteLocation -Force -Recurse
}
Catch {
    Write-Host "Error removing ""$($SetupCompleteLocation)"""
}

#Remove SetupConfig.ini
Try {
    $iniFilePath = "$($env:SystemDrive)\Users\Default\AppData\Local\Microsoft\Windows\WSUS\SetupConfig.ini"
    if (Test-Path -Path $iniFilePath) {
        $SetupConfigini_Content = Get-Content $iniFilePath
        foreach ($line in $SetupConfigini_Content) { 
            If ($line -like "PostOOBE=$($SetupCompleteLocation)\SetupComplete.cmd") {
                Remove-Item $iniFilePath -Force
            }
        } 
    }
}
Catch {
    Write-Host "Error removing ""$($iniFilePath)"""
}

Detect_SetupComplete.ps1

<#
.Synopsis
Created on:   10/04/2021
Created by:   Ben Whitmore
Filename:     Detect_SetupComplete.ps1

.Description
Detection script to be deployed with ConfigMgr to detect SetupComplete.cmd in $env:SystemDrive\ProgramData\FeatureUpdate\<version>\SetupComplete.cmd and to check SetupCOnfig.ini references the correct version of the application i.e. $env:SystemDrive\Users\Default\AppData\Local\Microsoft\Windows\WSUS\SetupConfig.ini POSTOOBE will reference SetupComplete.cmd as outlined above
#>

$SetupCompleteVersion = "1.09.04"
$SetupCompleteLocation = Join-Path -Path "$($env:SystemDrive)\ProgramData\FeatureUpdate" -ChildPath $SetupCompleteVersion

$FUFilesInComplete = $Null
$SetupConfigini_Valid = $Null

Try {
	If (!(Test-Path -Path $SetupCompleteLocation)) {
		$FUFilesInComplete = $True
	}
}
Catch {
	$FUFilesInComplete = $True
}

Try {
	$iniFilePath = "$($env:SystemDrive)\Users\Default\AppData\Local\Microsoft\Windows\WSUS\SetupConfig.ini"
	if (Test-Path -Path $iniFilePath) {
		$SetupConfigini_Content = Get-Content $iniFilePath
		foreach ($line in $SetupConfigini_Content) { 
			If ($line -like "PostOOBE=$($SetupCompleteLocation)\SetupComplete.cmd") {
				$SetupConfigini_Valid = $True
			}
		} 
	}
	else {
		$FUFilesInComplete = $True
	}
}
Catch {
	$FUFilesInComplete = $True
}

If (($SetupConfigini_Valid) -and (!($FUFilesInComplete))) {
	Write-Output "Installed"
}

The installation and removal scripts will reference Version.txt to install/remove the correct version of the application. We cannot reference Version.txt to get the application version when we use a script for the detection method so the version number must be manually updated within the detection script

The version number in the Detection Method script must be updated manually to reflect the content of Version.txt

Application Content Source

You should have the following files present in your application content source folder. (The Install/Uninstall and Detect scripts will not get copied to SystemDrive\ProgramData\FeatureUpdate\<version>).

Build the Application

1. Create a new Application in Configuration Manager

2. Choose to Manually specify the application information

3. Name the application Feature Update – Post OOBE Script – 1.09.04 and add a Software version: 1.09.04

4. Add a Deployment Type of type Script Installer

5. Name the Deployment Type Feature Update – Post OOBE Script – 1.09.04

6. Specify the content location for application source files as mentioned in the previous section “Application Content Source”

7. Set the Installation program to

powershell.exe -executionpolicy bypass -file "install_setupcomplete.ps1"

8. Set the Uninstallation program to

powershell.exe -executionpolicy bypass -file "uninstall_setupcomplete.ps1"

9. Set the Detection Method to use the Detect_SetupComplete.ps1 PowerShell script. Remember the version in the detection script must match the value within Version.txt

10. Set the user experience settings to

Installation Behaviour: Install for System
Logon requirement: Whether or not a user is logged on
Installation program visibility: Hidden
Maximum allowed run time (minutes): 15

11. Add a Requirement for the Operating System to equal Windows 10

12. Deploy the application as Required to the device collection that will be targeted for the Feature Update

Review Installation

You should observe the following on your targeted devices:-

  • SetupConfig.ini exists at SystemDrive\Users\Default\AppData\Local\Microsoft\Windows\WSUS\SetupConfig.ini and has the Priority and POSTOOBE values have been populated as expected
SetupConfig.ini
  • The folder SystemDrive\ProgramData\FeatureUpdate\1.09.04 exists and contains the expected files and folders
POSTOOBE Installation Folder
  • SetupComplete.cmd contains the following line
powershell.exe -executionpolicy bypass -file C:\ProgramData\FeatureUpdate\1.09.04\SetupComplete.ps1 -WindowStyle Hidden
  • SetupComplete.ps1 contains the following
$ScriptPath = Split-Path -Parent $MyInvocation.MyCommand.Definition

#Copy Files from Script Root to Feature Update staging folder     
Try {
    $FilestoCopy = Join-Path -Path $ScriptPath -ChildPath "Files"
    Robocopy.exe $FilestoCopy $env:systemdrive\ /e /z /r:5 /w:1 /eta
}
Catch {
    Write-Warning: "Error copying files to ""$($env:systemdrive)"""
}

#Do other stuff here...

POSTOOBE Review

After the Feature Update has completed, you can review Setupact.log in the C:\Windows\Panther folder and see that your script was used during POSTOOBE

Setupact.log

And in our example, the default User Account Pictures were restored and the new wallpaper copied to the Windows\Web\Wallpaper directory (and set by policy)

Default User Account Pictures restored
New wallpaper added (and set via Policy)

Summary

In this blog post we looked at how we could manipulate the Feature Update process when it is being deployed using the Windows Update Service. Now you understand the concept of SetupConfig.ini and POSTOOBE you can very easily adapt the application to be deployed as a Win32app in Intune. There are other actions you can leverage using SetupConfig.ini to give your users the best experience during a Feature Update.

SetupConfig.ini is not as versatile as using a Task Sequence but it gives us some degree of control over the update process. I am really excited to see the new feature in ConfigMgr 2103 where we can deliver Feature Updates in a Task Sequence!

Further reading and best practice can be found below

Best practices – deploy feature updates for user-initiated installations – Windows Deployment | Microsoft Docs

Windows Setup Command-Line Options | Microsoft Docs

https://docs.microsoft.com/en-us/windows/deployment/update/feature-update-user-install#step-2-override-the-default-windows-setup-priority-windows-10-version-1709-and-later

(766)

The post Running custom actions during a Windows 10 Feature Update with Configuration Manager appeared first on MSEndpointMgr.


WIM Witch v3.1 – 21H1 Support, Some Fixes, Some Bugs

$
0
0

This release of WIM Witch brings support for Windows 10 21H1!

Adding support for this operating system presented unique challenges as Microsoft didn’t correctly update a key image property that is critical in determining the Windows 10 version number from an unmounted WIM file. In addition, a registry key that provided an easily queryable value to determine the version of a mounted WIM has been deprecated by Microsoft. Both scenarios took some time to figure out how to properly extrapolate the available information without prompting the user.

2004 WIM. Note the version number.
20H2 WIM. The version is the same, Only the patch level increased.
21H1 WIM. See the pattern?

Why is the above such a problem? When the image is installed:

  • 2004 has a version of 10.0.19041.X
  • 20H2 has a version of 10.0.19042.X
  • 21H1 has a version of 10.0.19043.X

Thankfully, some differences in the offline media were found that allowed WIM Witch to accurately import binaries from ISO without additional user intervention.

Windows 10 2004. 20H2, and 20H1 are all very similar and can share certain packages. This is why the Language Pack and Features on Demand ISOs haven’t been updated since version 2004, and why we can use the 2004 LP and FOD media for 20H2 and 21H1. The overlap also includes .Net 3.5 installers.

It’s also why 2004 is the only 2XXX version in this screen. That and I didn’t get around to updating it….

Those users that enjoy watching WIM Witch logging in the console window will notice that 21H1 uses a source path containing “2009” when applying .Net, and folks who are applying language packs will notice the source path goes to “2004”.

Bug Fixes

OSDSUS Superseding Updates now actually removes superseded updates for 2009/20H2.

A possible solution for users on Server 2016 who cannot import from an ISO has been implemented. If you are using 2016, please let me know if your experience has improved.

What’s Broken

OneDrive Update Function – The permissions seem to have changed on either the folder or the file itself. Currently WIM Witch does not grant proper permission to the file/folder and will get an access denied error during copying.

ISO Creation not reliable with multiple options – During testing, ISOs weren’t being created when most of the WIM Witch options were selected. When creating a stand-alone ISO, she seems to work just fine. No clue on root cause.

Deprecation Warning

In an upcoming version of WIM Witch, the support for 1703, 1709, 1803, and 1903 will be removed from the GUI as these versions have gone End of Life. The versions that correspond to Long Term Servicing Channels (1607 and 1809) will be left in place until they finally lose support.  I also plan on leaving the variables active in the code to provide backwards compatibility for anyone who has an older automation built with WIM Witch’s command line functions.

Uh…Just One More Thing

Oh, Just One More Thing..." COLUMBO Set For Revival - Last Movie Outpost
There’s something that is still bothering me…

If you made it this far, and are still wondering how WIM Witch differentiates between 2004, 20H2, and 21H1 while the WIM is unmounted, let me share with you the results of my deep dive detective work.

Historically, WIM Witch has used the “Created Date” property of the unmounted WIM to differentiate between 2004 and 20H2. This process was based on an assumption that I made with the 190X versions that suffered from the same problem. I assumed that a Windows image created after August 31st, 2020 would be 20H2, and before it would be 2004. While technically accurate, this doesn’t take into account that every updated ISO of Windows gets a new created date, and therefore newly updated 2004 media may get falsely identified as 20H2. I’ll need to revisit this assumption in another release….

I am also assuming that most admins are deploying 20H2 and not 2004 so hopefully this problem has largely solved itself. If you do need 2004, get an ISO with a release prior to August 2021 to ensure WIM Witch works as expected.

For 20H2 vs 21H1, I found a consistent difference between the two based on file count of the ISOs:

The folders above had been imported by WIM Witch, so they are missing the “install.wim” file. That’s why they are all 1 file short.

So what is that file difference? Microsoft Edge.

This image above shows the difference in the AppX Provisioned Apps list from 20H2 (left) and 21H1 (right). 20H2 ships with one additional AppX app, “MicrosoftEdge.Stable”. 20H2 comes with “New Edge” in AppX form. But what about 21H1? A quick differencing script provides the answer:

Edge in 21H1

Edge in 21H1 comes in the form of the above folder “microsoft-edge-migration-plugin” and four files.

Based on the data I have seen, I am making a reasonable assumption that the file count will be stable after being patched, and is reliable. Here’s hoping I am correct!

(824)

The post WIM Witch v3.1 – 21H1 Support, Some Fixes, Some Bugs appeared first on MSEndpointMgr.

5 Ways to Get Ahead with ConfigMgr and Endpoint Insights

$
0
0

Is your organization transitioning from working at home to going back to the office? We want to help make this as seamless as possible. How? Endpoint Insights gives you the most comprehensive view of your endpoints. Instantly get access to hundreds of critical environment data points you simply can’t see natively in ConfigMgr. Whether it’s gaining important insights about what computers, monitors, docking stations and printers are back at the office to knowing critical insights about what software was installed by users on their devices while working from home, we can help!  

5 Ways to Get Ahead

How does Endpoint Insights help you? Endpoint Insights captures data like nothing else can. We give you the knowledge to make decisions and act. Check out these 5 ways to get ahead!

Computers
Do you know what laptops are coming back to the office? Do you know how many will need to be replaced? With Endpoint Insights, you can see what computers are in your environment. You’ll see the total number of laptops, desktops, servers and virtual machines. You can see how old they are and then use our handy report to start life-cycle planning and budgeting for their replacements.

Monitors
Do you know what monitors are coming back to the office? Do you know how many monitors you’ll need to purchase when your computers are upgraded? Endpoint Insights will tell you how many monitors, the brands and models, that are in your organization. From knowing the total count of monitors to knowing what cables are needed by workstations, Endpoint Insights instantly delivers answers.

Docking Stations

How many docking stations do you have? What models are they? Endpoint Insights helps you see what’s in your environment. Perhaps there’s a new set of drivers that will fix a problem for some users and you are planning on deploying the repair with ConfigMgr. You can create a collection to target computers with a specific docking station through Endpoint Insight’s inventory tool. Now you can put in place an action plan.

Printers

How can you tell what printers everyone is connected to? Do you have enough printers? Too many? Endpoint Insights shows you what printer everyone is connected to, and, in addition, what print server each printer is connected to, so you can take appropriate action.

User-Installed Software
Do you know what software was downloaded by users onto their devices that isn’t allowed in your organization? For over a year now, many end-users have thrown caution to the wind and downloaded whatever software they needed. This blog post highlights this problem. Organizations want to know what was installed without their knowledge, so you can use Endpoint Insights to tell you!

Endpoint Insights Webinar

Want to learn more? See how you can access new data that you’ve never had before – insights on databases, monitors, warranty information, and more – all natively within ConfigMgr. Join me, the creator of Endpoint Insights, and my teammate, Marty Miller, as we unveil Recast’s newest security and compliance product, Endpoint Insights. Introducing: Endpoint Insights – Webinar – Recast Software

(230)

The post 5 Ways to Get Ahead with ConfigMgr and Endpoint Insights appeared first on MSEndpointMgr.

WIM Witch v3.2.0 – Windows 11 and Server 2022 Support

$
0
0

This release of WIM Witch brings support for Windows 11 and Windows Server 2022 image servicing. While building in the support, decisions were made to bring package handling for Windows Server in-line with future releases of this OS class. Subsequently, there are some breaking changes that need to be addressed.

TL;DR – Breaking Changes – To service Windows Server OS’s, the existing .Net 3.5 and Software Updates locations are no longer used. These packages will need to be re-imported. The legacy locations can be deleted.

Windows 11 and Windows Server 2022

Software Updates are now working with Windows 11 and Windows Server 2022, and both work with OSDSUS and Configuration Manager.  In addition to adding support for these new operating systems, improvements to runtime detection of the OS and the version were incorporated to decrease the effort in supporting new versions of Windows.

With the new folder structure for Windows Server class operating systems, the old folders of updates stored under .”\Updates\Windows Server 2016″ and “.\Updates\Windows Server 2019” will be orphaned. Please feel free to delete them.

The deprecated folders. Delete these

The new storage locations will be under “.\updates\Windows Server”, with the binaries stored under the corresponding 4-digit version sub-folder.

The new location of Windows Server updates

Changes to .Net 3.5 Package Handling

Supported Operating Systems will no longer share the .Net packages based on Release ID (1809, 1909, etc). Now, Windows Server and Windows 11 have different sub-folders under the main Imports folder (i.e. .\Updates\Windows Server\21H2). To support existing Windows 10 save files and Configuration Manager package configurations, Windows 10 .Net packages will continue to be placed in folders titled by Release ID, without a Product Folder.

This means that for Windows Server servicing, users will need to re-import .Net 3.5 packages. The existing packages can be considered orphaned and deleted.

The 4-digit folders are only used for Windows 10. Existing packages for Server will be ignored
The new location of the Server .Net packages

LPs, LXPs, and FODs with Windows 11

There have been some changes regarding languages with Windows 11. If you are unfamiliar with these changes, you may want to read this posting – Update to language imaging in Windows 11

The importation of Language Packs, Local Experience Packs, and Features on Demand have changed slightly with Windows 11. This is due to a change in the file and folder structure of the ISO. With Windows 11, all of the optional packages are contained in one ISO file. Further, the Language Pack cabs are now in the same folder as the Features on Demand cabs.

Language Packs

To import language packs, mount the ISO that contains the binaries, select the options in the image below, and hit the select button. The folder the needs to be selected is “LanguageAndOptionalFeatures”. This folder contains both LP and FOD cabs, but WIM Witch automatically filters for the language packs. Select the ones that are needed and hit OK.

Local Experience Packs

These package types work the same way as in versions past. Just make sure to select the folder titled “LocalExperiencePack” and not any of the sub-folders.

Features on Demand / Optional Features

The importation of Feature On Demand packages is different for Windows 11. Users will be presented an out-grid view that will allow them to select individual files, instead of importing the entirety of the ISO as it is now with Windows 10. Mount the ISO that contains the binaries and select the “LanguagesAndOptionalFeatures” folder. Then hit the Select button.

Select the files that are required, then press OK.

Start Menu Layout file

Windows 11 changes how the start menu layout file is exported and imported. Instead of a XML file, Windows 11 now uses a JSON file. WIM Witch will determine if a XML or JSON should be chosen based off of the wim file selected on the “Select WIM” tab.

For information on how to export this file and how to customize it, check out “Customizing Windows 11 default Start Menu during OSD using LayoutModification.json”

Servicing Stack Updates and Windows 10 2004/20H2/21H1

WIM Witch now processes these versions of Windows 10 differently than the other operating systems. To safeguard against a required LCU and/or SSU being expired or not available for download, WIM Witch will extract the Servicing Stack Update and the monthly Cumulative Update from the current LCU package, then install the individual updates in order.

Deprecated Operating Systems

The option to select Window 10 version that have gone out of support (1709, 1803, and 1903) have been removed from the UI but the code to support those operating systems are still present. While existing save/config files should still work for these operating systems, there are no guarantees on functionality and will not be supported.

As an advanced warning, WIM Witch will drop support for Windows 10 2004 in December of 2021 when this version goes out of support.

The current options for manual update downloads.

Command Line Parameters

-Win11Version  Allows WIM Witch to download updates for Windows 11

-Server2022  Allows WIM Witch to download updates of Server 2022

-Win10Version  Removed depreciated OS’s and added 21H1 option

-HiHungryImDad  Added invoke function prior to starting WIM Witch GUI.

(2100)

The post WIM Witch v3.2.0 – Windows 11 and Server 2022 Support appeared first on MSEndpointMgr.

Update Compliance – Checking client prerequisites

$
0
0

Background

Before you can begin to process Update Compliance data from your devices, you must first ensure that they meet the requirements to participate in the Update Compliance process. Update Compliance uses Windows client diagnostic data for all of its reporting. It collects data for update deployment progress, Windows Update for Business configuration data, and Delivery Optimization usage data. Collected data is sent to a customer-owned Azure Log Analytics workspace.

Sometimes we observe discrepancies with actual vs expected Log Analytics Data. This can often be because the client is failing to meet the prerequisites to collect or send its diagnostic data. The aim of this post is to help you identify the reason(s) why your devices may not be sending telemetry in the expected way.

TL;DR The Check-UpdateComplianceSettings.ps1 script in this post will check that the device meets the prerequisites to send diagnostic data to Update Compliance. The script is designed to be run as a Proactive Remediation from Intune and is based on a similar script Microsoft provides for Update Compliance health and remediation

The solution outlined in this post is aimed at Intune managed devices. Microsoft do provide a script and some other binaries to check and remediate Update Compliance issues on devices. The Microsoft solution works well but I don’t like to deviate from Configuration Profiles if I can help it. IMO, there are already many configuration options in Intune and adding a script with binaries to configure Update Compliance draws me too far away from a position I am comfortable with.

Client Prerequisites

Windows 10/11

Update Compliance works only with Windows 10 or Windows 11 – that should be pointed out straight away. If we were to expand on that point, only the Pro, Education and Enterprise SKUs are supported. A compatibility matrix can be found below

Windows 10Windows 11Windows ServerSurface HubIoTOther
Home❌ ❌
Professional✔ ✔
Education✔ ✔
Enterprise✔ ✔
Enterprise Multi-session✔ ✔
Supported OS for Update Compliance

Required Endpoints

The device must be able to contact certain endpoints for both authentication and sending of diagnostic data. It is important to make consideration for the following endpoints on your proxy or firewall

  • https://v10c.events.data.microsoft.com
  • https://v10.vortex-win.data.microsoft.com
  • https://settings-win.data.microsoft.com
  • http://adl.windows.com
  • https://watson.telemetry.microsoft.com
  • https://oca.telemetry.microsoft.com
  • https://login.live.com

Required Services

It is difficult to single out individual Windows services and dependencies but specific to Update Compliance, the following services are required to be present and healthy

  • wlidsvc (Microsoft Account Sign-in Assistant)
  • diagtrack (Connected User Experiences and Telemetry)

Required Policies

We can now use the Settings Catalog to configure all Update Compliance settings instead of Custom Configuration Profiles

Settings Catalog

Required Windows Configuration

Other information that is required to be present and healthy for the device to process and send diagnostics for Update Compliance

  • SQMID The Windows SQM (Software Quality Metrics) device identifier
  • UTC CSP The Win32CompatibilityAppraiser configuration service provider

Solution

Check-UpdateComplianceSettings.ps1 is a script designed to be deployed as a pre-remediation detection script using a Proactive Remediations in Endpoint Analytics.

The script must be run in the SYSTEM context

When creating the Proactive Remediation, ensure you select to run as 64-bit PowerShell

Run script in 64-bit PowerShell

The script will check the following conditions on the device

  • CheckSqmID
  • CheckCommercialId
  • CheckTelemetryOptIn
  • CheckConnectivityURL(s)
  • CheckUtcCsp
  • CheckDiagtrackDLLVersion
  • CheckDiagtrackService
  • CheckMSAService
  • CheckAllowDeviceNameInTelemetry
  • CheckAllowUpdateComplianceProcessing
  • CheckAllowWUfBCloudProcessing
  • CheckConfigureTelemetryOptInChangeNotification
  • CheckConfigureTelemetryOptInSettingsUx

If some conditions do not PASS the tests successfully a hard fail is recorded and the pre-remediation detection script will exit with a code of 1 (Fail) and the failure(s) will be listed in the pre-remediation detection output column

Failed test results are displayed

If all tests PASS successfully, OK will be listed in the pre-remediation detection output column

If all tests pass OK is displayed

Interactive Option

You can view more detailed information if you run the script interactively on a client. You may wish to do this while troubleshooting an issue.

The script needs to be run in 64 bit PowerShell and in the SYSTEM context. You can achieve this by using PSEXEC (64bit) included in PSTools from Sysinternals

psexec64 -s -i C:\Windows\System32\WindowsPowerShell\v1.0\powershell.exe
Running 64bit PowerShell as SYSTEM

The script accepts 2 parameters

  • Detailed – This option outputs the results in a table
  • ExportJSON – This option outputs the results as a JSON.
No parameter passed
Detailed parameter passed
Export-JSON parameter passed

Next Steps

We intend to ingest the device Update Compliance health into Log Analytics so we can compare any Update Compliance reporting anomalies with the last successful OK health status of the device from the proactive remediation.

Proactive Remediations are very versatile. This solution doesn’t contain a remediation script but we can see how powerful it can be just to collect information for inventory and troubleshooting.

Reach out if you need help, Ben.

(3594)

The post Update Compliance – Checking client prerequisites appeared first on MSEndpointMgr.

WIM Witch v3.3.0 – Remote Configuration Manager Integration

$
0
0

Version 3.3.0 of WIM Witch brings independence from the Primary Site Server for those leveraging Configuration Manager integration. This means that WIM Witch isn’t subject to DISM limitations of older versions installed on legacy server operating systems, having to perform the building on the PSS, etc. For users who already have a WIM Witch installation on a PSS, the path of migration is very simple (It’s copy + paste)

Prerequisites

The Configuration Manager console must be installed on the computer that will run WIM Witch. This is to provide the Configuration Manager PowerShell modules.

The PC must be running a supported version of Windows 10 or 11.

Configuration

Select the ConfigMgr tab in WIM Witch, then type in the Site Code and the Site Server FQDN in the respective fields. Once the fields have been updated, click the “Set” button. This action will save the site information into a XML under the “ConfigMgr” folder within WIM Witch.

When WIM Witch starts, she looks for the “SiteInfo.xml” file if she can’t get the site information from the registry. If the file is found, she will populate the fields and load the required functions.

To install the Configuration Manager console extension, simply click the “Install” button. Note that you must have the option “Hierarchy approved console extensions can be unsigned” must be checked in order to see the WIM Witch extensions. This option can be found under the “Hierarchy Settings” in Administration.

Migration

Copy the entire WIM Witch folder from the previous installation to the new computer, then run the integration steps listed above.

If the new folder location is the on the same drive letter and path as the old, everything should just work. If the drive or path is different, the Config file will need to be manually updated. To edit the file, select “Edit WIM Witch Image Config” in the Operating System Images section in the Configuration Manager console. This will load the parameters.

Once the Config has been loaded, update the Source WIM, the LP/LXP/FODs, and Mount Path. Once the required fields have been modified, simply click “Make It So” to start the build. This process will automatically save the changes.

One Word of Caution

There are no file locks or checks on the OS Images that have been created by WIM Witch. Problems are likely to occur if multiple users are trying to edit or update the same OS Image.

As always, let me know if you think!

(1556)

The post WIM Witch v3.3.0 – Remote Configuration Manager Integration appeared first on MSEndpointMgr.

Viewing all 347 articles
Browse latest View live


Latest Images